 Etappe
3. The main window#
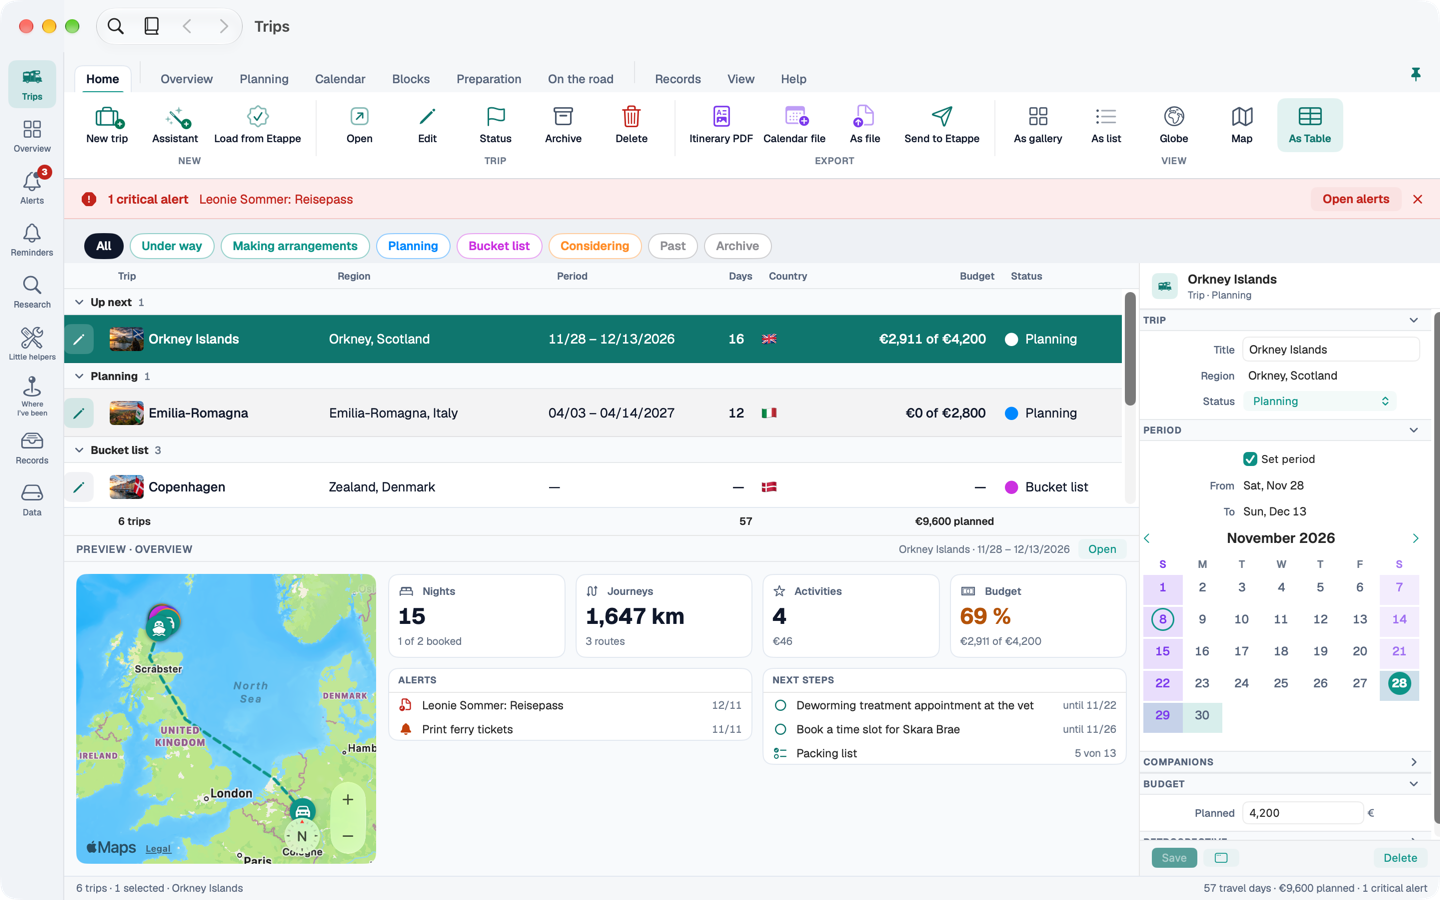
The main window has three zones: the sidebar on the left, the ribbon at the top, and the content below.
3.1 The sidebar#
The narrow bar on the left leads to the nine destinations of the app. Each has its own shortcut:
| Destination | Shortcut | What you find there |
|---|---|---|
| Trips | ⌘1 | All trips in five views (Viewing trips) |
| Overview | ⌘2 | Focus and timeline across all trips (Overview) |
| Alerts | ⌘3 | Everything that needs attention, with a number on the icon |
| Reminders | ⌘4 | Reminders of all trips and without a trip |
| Research | ⌘5 | Ideas and finds, also without a trip |
| Little helpers | ⌘6 | Deworming, currency and hiking calculators, travel dictionary |
| Where I’ve been | ⌘7 | The world map of your countries |
| Records | ⌘8 | People, pets, vehicles, countries, templates |
| Data | ⌘9 | Backup, trip as file, storage |
3.2 The ribbon#
Above the content sits the ribbon: a row of tabs and below it a band with the tab's commands, sorted into groups. The tabs are always there:
- Start carries the commands of the destination selected in the sidebar – different ones for “Trips” than for “Alerts”.
- At a glance, Planning, Calendar, Blocks, Preparation, On the road belong to the open trip. Each tab shows its first section straight away. If no trip is open, their commands are greyed out.
- Records, View, Help apply everywhere.
With a trip open, a tile with the trip's picture sits on the left of the band. Clicking it always takes you to the trip's overview (⇧⌘0). ⌥⌘← and ⌥⌘→ switch to the previous and next tab.
To save space, ⌃⌘B turns the band's labels off and on, ⌃⌘R collapses the ribbon to its row of tabs (like the pin at the top right), and ⌃⌘S hides the sidebar.
Buttons that create something are named explicitly – “New accommodation”, “New journey” and so on – and carry a plus. Red stands for deleting and for anything critical.
3.3 The alert band#
If a critical alert is open, a red band with the alert and an “Open alerts” button appears below the ribbon. You can close it; it then stays away for these alerts until the next launch. A new critical alert brings it back at once. It doesn't appear under “Alerts” itself.
3.4 Back, forward and search#
At the top left of the window bar are the magnifying glass, the manual and the Back and Forward arrows. They work as in the Finder (⌘[ and ⌘]) and remember destination, trip, section and selection.
Search (⌘F or Edit → Search …) opens a field above the window, similar to Spotlight. It finds trips, entries, preparation, research, reminders and records, ignoring case and accents. Use ↑ and ↓ to choose, ⏎ to jump there, ⎋ to close.
3.5 More windows#
Open another main window with ⌥⌘N. Open a trip in its own window without the sidebar with ⌃⌘O – handy for seeing two trips side by side. Make the text larger with ⌘+, smaller with ⌘−, and reset it with ⌘0.
3.6 The menu bar#
Besides the macOS menus – File, Edit, View – Etappe has two of its own: Trip and Go. The commands always act on the window in front. File holds New trip (⌘N), the trip assistant (⇧⌘N), a new window (⌥⌘N) and the itinerary as PDF (⌘P); Trip holds Edit (⌘E), Duplicate journey (⌘D), Create entries from the sketch (⌘R) and Trip in new window (⌃⌘O).