 Etappe

1. Etappe on the Mac#
Etappe for Mac is a Mac app of its own. It works with the same trips, people, pets and vehicles as Etappe on iPhone and iPad, but it behaves like a Mac program: with windows, a menu bar, keyboard shortcuts, and drag and drop. This manual only covers what is different on the Mac. What an accommodation, a sketch or an alert is, is explained in the manual for iPhone and iPad.
You get Etappe for Mac from the Mac App Store (Installing and switching over).
1.1 What is different from iPhone and iPad#
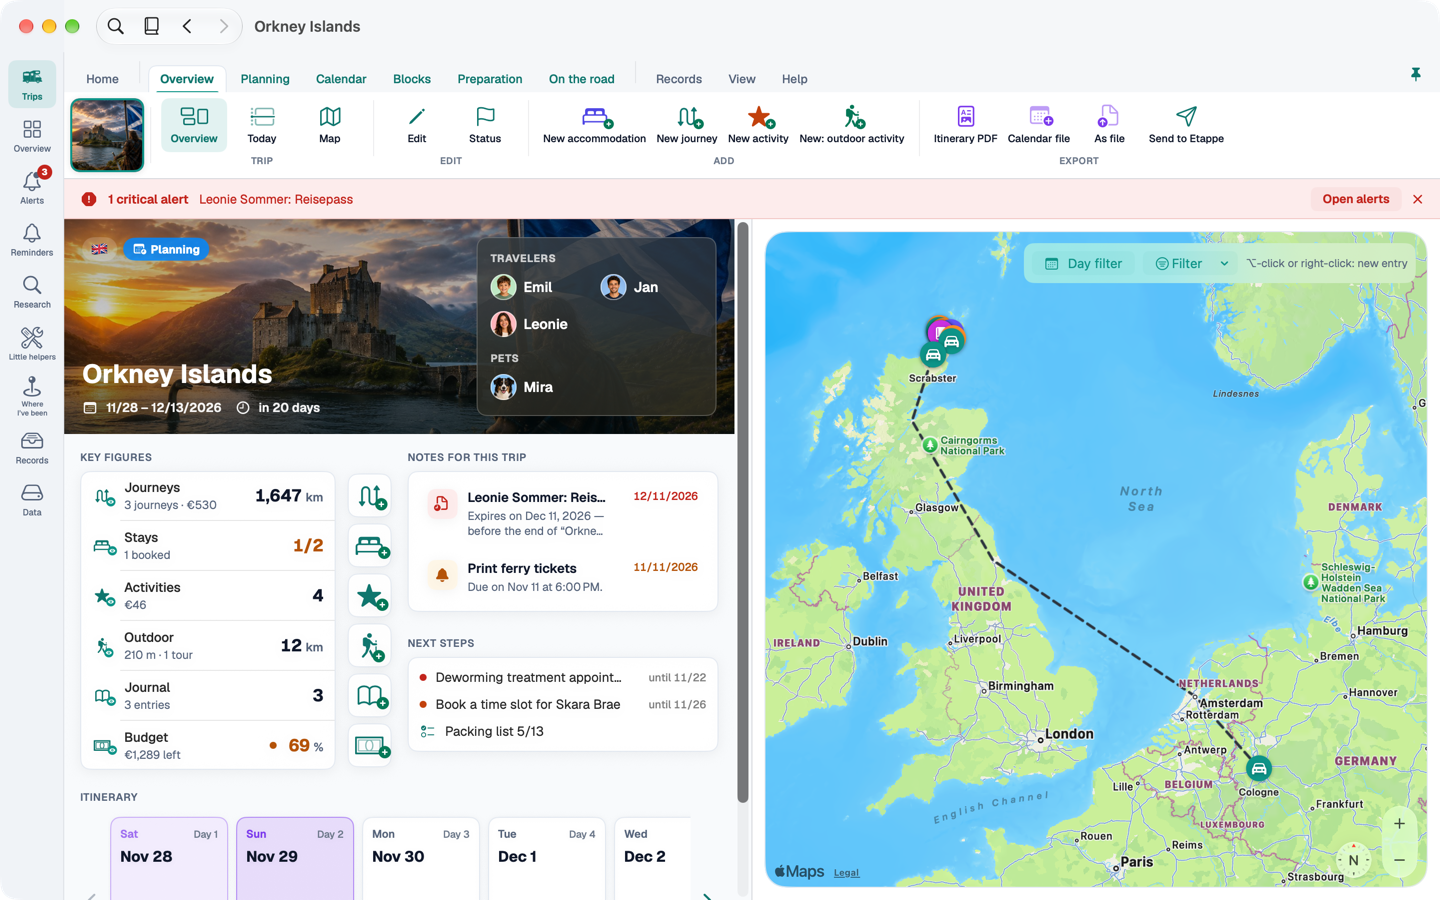
- One main window with a sidebar and a ribbon. On the left are the nine destinations of the app, at the top a band of tabs and commands – more in The main window.
- Forms open in their own windows. You can have several open at once, for example an accommodation next to the calendar (Form windows).
- More views. Trips as a gallery, list, globe, map or table; list sections optionally in a compact layout with an inspector.
- Keyboard. You can reach almost everything without a mouse (Keyboard shortcuts).
- What is missing: recording a journey, the camera, Apple Watch and quick actions exist only on iPhone and iPad (Only on iPhone and iPad).
1.2 Requirements#
Etappe for Mac runs on Macs with Apple silicon on macOS 14 or later. The app is available in German, English and French and follows the language you have set in macOS.
1.3 Purchase and trial#
The Mac app belongs to the same App Store listing as Etappe for iPhone and iPad. If you have already bought the full version, the purchase also applies on the Mac – you don't buy anything twice. Without a purchase, the Mac starts its own 14-day trial; the trial runs per device. You can see where you stand under Etappe → Full version … and in Settings under “Full version”.
As on iPhone and iPad: viewing, sorting, archiving, deleting and exporting stay free after the trial. Only creating and changing entries needs the full version.
1.4 Your data and iCloud#
If you are signed in to macOS with the same Apple Account as on iPhone and iPad, Etappe syncs your data via iCloud. On first launch, the Mac app waits until the first sync has finished before it creates templates, the sample trip or countries – so nothing is created twice. If you don't want to wait, choose “Don’t wait – I’m starting fresh”.
Without iCloud, the data stays on the Mac. There is no Etappe server and no account.
2. Installing and switching over#
2.1 Download#
Get Etappe for Mac from the Mac App Store: Etappe in the Mac App Store. It is the same listing as for iPhone and iPad. Downloading is free. If you have already bought the full version, it applies on the Mac too (Purchase and trial).
If your Mac has been running the “Designed for iPad” version, the Mac app takes its place (see below). A backup before the first launch is a good idea, for example on your iPhone (Backup).
You send questions and suggestions by email via Help → Send feedback.
2.2 First launch#
If your data is empty, Setup takes you through the same steps as on iPhone: welcome, countries (load country data, home country, base currency), travellers (people and pets), vehicle and, if you like, a first trip with the assistant. You create people, pets and vehicles in their own windows. You can close Setup at any time and open it again later via Help → Setup.
If the Mac syncs your data via iCloud, Setup does not appear: your trips then come from iPhone and iPad (Your data and iCloud).
2.3 Switching over from the “Designed for iPad” version#
Until now, the iPad version of Etappe ran on Macs with Apple silicon. Etappe for Mac takes its place. When you switch over:
- Your data stays. The Mac app opens the same data that the iPad version created on this Mac.
- The app lock stays. If you had set a PIN in the iPad version, the Mac app takes it over once when you switch. After that you unlock as usual, with Touch ID if you like (App lock).
- The trial runs per device. If you bought the full version, it still applies.
3. The main window#
The main window has three zones: the sidebar on the left, the ribbon at the top, and the content below.
3.1 The sidebar#
The narrow bar on the left leads to the nine destinations of the app. Each has its own shortcut:
| Destination | Shortcut | What you find there |
|---|---|---|
| Trips | ⌘1 | All trips in five views (Viewing trips) |
| Overview | ⌘2 | Focus and timeline across all trips (Overview) |
| Alerts | ⌘3 | Everything that needs attention, with a number on the icon |
| Reminders | ⌘4 | Reminders of all trips and without a trip |
| Research | ⌘5 | Ideas and finds, also without a trip |
| Little helpers | ⌘6 | Deworming, currency and hiking calculators, travel dictionary |
| Where I’ve been | ⌘7 | The world map of your countries |
| Records | ⌘8 | People, pets, vehicles, countries, templates |
| Data | ⌘9 | Backup, trip as file, storage |
3.2 The ribbon#
Above the content sits the ribbon: a row of tabs and below it a band with the tab's commands, sorted into groups. The tabs are always there:
- Start carries the commands of the destination selected in the sidebar – different ones for “Trips” than for “Alerts”.
- At a glance, Planning, Calendar, Blocks, Preparation, On the road belong to the open trip. Each tab shows its first section straight away. If no trip is open, their commands are greyed out.
- Records, View, Help apply everywhere.
With a trip open, a tile with the trip's picture sits on the left of the band. Clicking it always takes you to the trip's overview (⇧⌘0). ⌥⌘← and ⌥⌘→ switch to the previous and next tab.
To save space, ⌃⌘B turns the band's labels off and on, ⌃⌘R collapses the ribbon to its row of tabs (like the pin at the top right), and ⌃⌘S hides the sidebar.
Buttons that create something are named explicitly – “New accommodation”, “New journey” and so on – and carry a plus. Red stands for deleting and for anything critical.
3.3 The alert band#
If a critical alert is open, a red band with the alert and an “Open alerts” button appears below the ribbon. You can close it; it then stays away for these alerts until the next launch. A new critical alert brings it back at once. It doesn't appear under “Alerts” itself.
3.4 Back, forward and search#
At the top left of the window bar are the magnifying glass, the manual and the Back and Forward arrows. They work as in the Finder (⌘[ and ⌘]) and remember destination, trip, section and selection.
Search (⌘F or Edit → Search …) opens a field above the window, similar to Spotlight. It finds trips, entries, preparation, research, reminders and records, ignoring case and accents. Use ↑ and ↓ to choose, ⏎ to jump there, ⎋ to close.
3.5 More windows#
Open another main window with ⌥⌘N. Open a trip in its own window without the sidebar with ⌃⌘O – handy for seeing two trips side by side. Make the text larger with ⌘+, smaller with ⌘−, and reset it with ⌘0.
3.6 The menu bar#
Besides the macOS menus – File, Edit, View – Etappe has two of its own: Trip and Go. The commands always act on the window in front. File holds New trip (⌘N), the trip assistant (⇧⌘N), a new window (⌥⌘N) and the itinerary as PDF (⌘P); Trip holds Edit (⌘E), Duplicate journey (⌘D), Create entries from the sketch (⌘R) and Trip in new window (⌃⌘O).
4. Viewing trips#
Under Trips (⌘1) you see all your trips. Chips at the top filter by status. How the trips are shown is up to you, in the “View” band or with a shortcut; the Mac remembers your choice.
| View | Shortcut | What for |
|---|---|---|
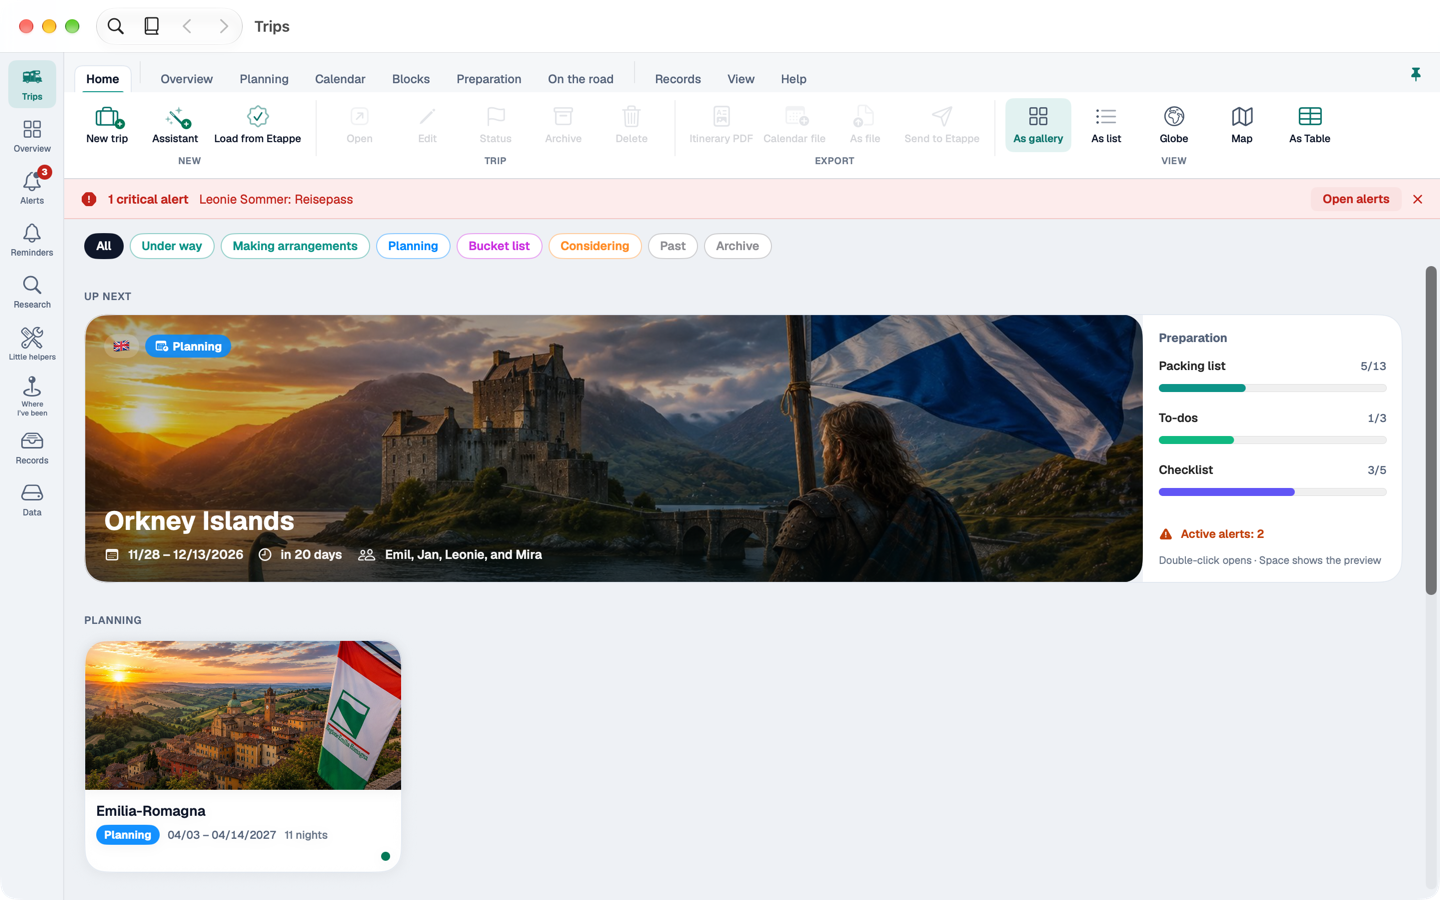
| Gallery | ⌃⌘1 | Large cards with pictures, the current or next trip as a banner at the top |
| List | ⌃⌘2 | With “All”, five columns by status |
| Globe | ⌃⌘3 | Your trips as pins on a globe you can turn |
| Map | ⌃⌘4 | The same pins on a flat map |
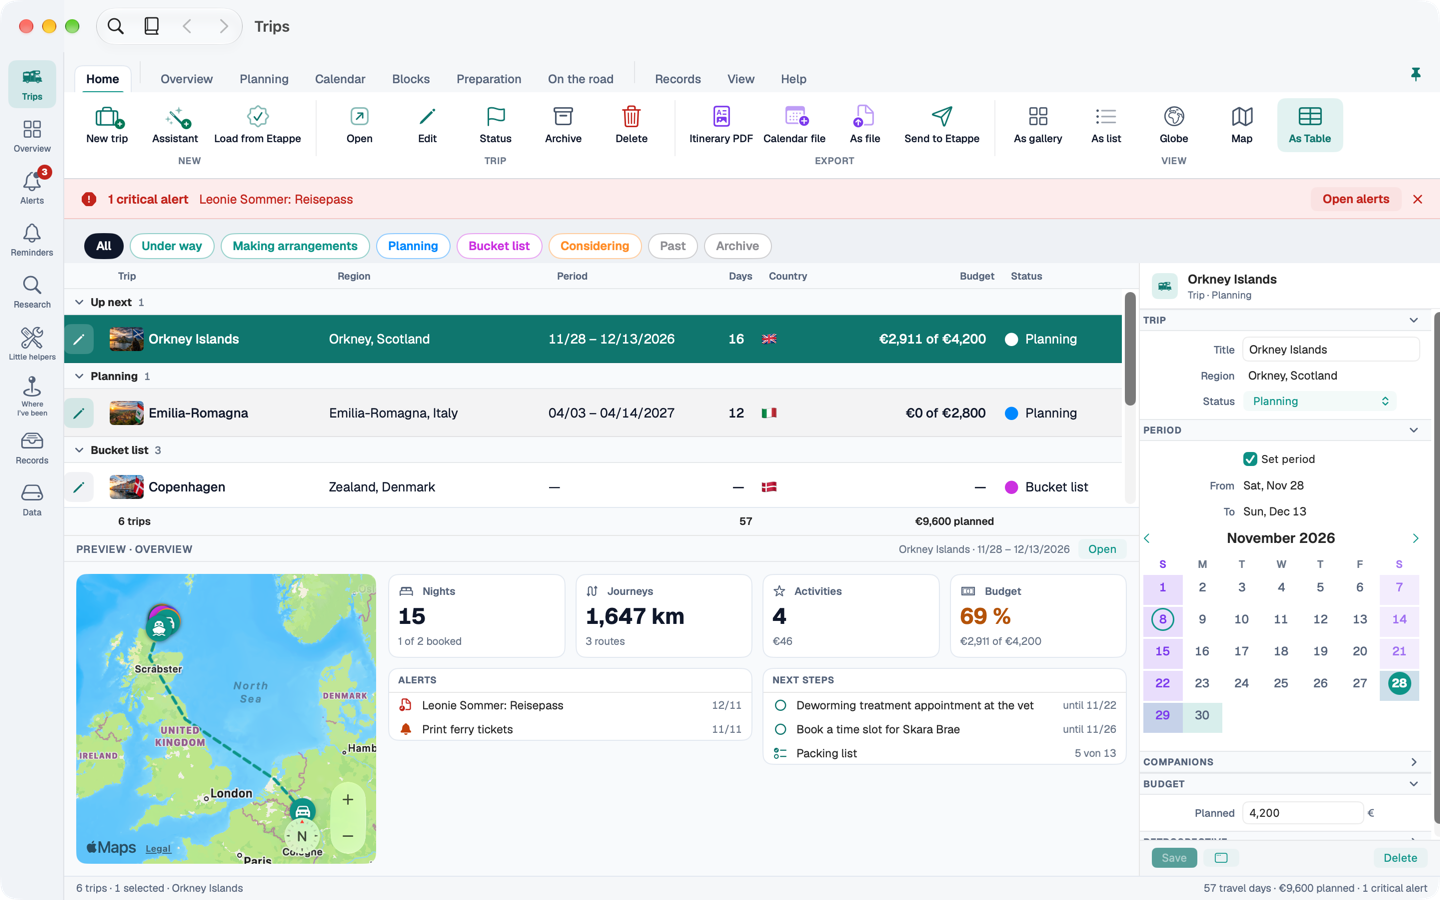
| Table | ⌃⌘5 | All trips as a table with preview and inspector |
4.1 Gallery#
At the very top is the current trip, otherwise the next one, with its preparation and alerts. Below follow the other trips as cards with nights, travellers, budget light and alert badges. A click selects a trip, a double-click opens it.
If a trip is running today but its status is not yet “Under way”, Etappe suggests the change. The status is only set when you click.
4.2 List#
With “All”, the list shows five columns, one per status. Drag a trip into another column to change its status; ⌘Z undoes it, as it does dropping a trip in the archive. On the right of the chip row are the archive and the bin as drop targets. With the bin, Etappe asks twice before a trip is deleted.
4.3 Globe and map#
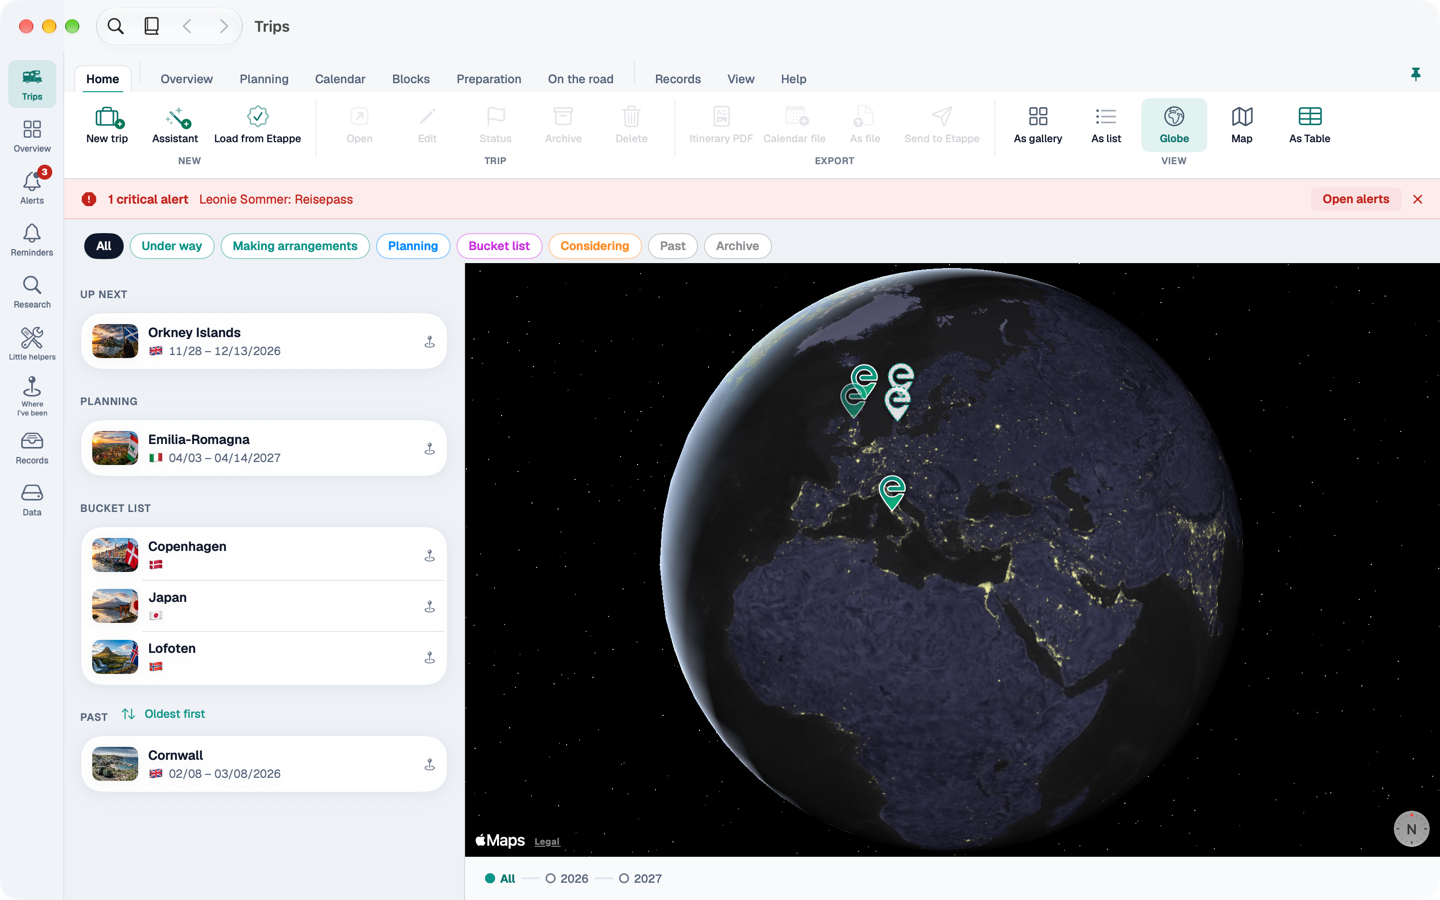
On the left is a compact list, on the right the globe or map with one pin per trip. Hover over a row in the list and its pin lights up, and vice versa. A timeline lets you choose the years.
4.4 Table#
The table groups trips by status; the groups fold in and out. Below, a preview shows the selected trip with map, key figures, alerts and next steps; on the right, the inspector edits title, region, status and dates without opening a window. A double-click opens the trip.
4.5 With the keyboard#
In every view, the arrow keys move between trips, ⏎ opens the selected one, the space bar shows a preview. Trips in the sidebar (or ⌘1) closes an open trip and takes you back to all trips. Create a new trip with ⌘N, or with the assistant via ⇧⌘N.
5. A trip#
When you open a trip, its tabs appear in the ribbon. The sixteen sections of a trip are spread like this:
| Tab | Sections |
|---|---|
| At a glance | Overview, Today, Map |
| Planning | Sketch, Calendar, Research |
| Calendar | Commands for the calendar |
| Blocks | Accommodations, Journeys, Activities, Outdoor activities |
| Preparation | Checklist, Packing list, To-dos, Reminders |
| On the road | Budget, Journal, Documents |
5.1 The overview#
At the top left is the trip's banner with travellers and pets; clicking a name takes you to the records. Below are the key figures: journeys, accommodations, activities, outdoor activities, journal and budget. Clicking a figure shows the section, the plus next to it creates a new entry. Beside them are the trip's notes and next steps. On the right, the map shows every place of the trip, filtered by type and day.
Below follows the itinerary: one card per day with the day theme, the day's entries and the night's accommodation. If accommodation is missing, it says so in orange. Hover over a day and its places light up on the map; a click shows the day in the calendar.
5.2 Sections with places#
Accommodations, journeys, activities, outdoor activities and the journal show the list on the left and a map on the right. Hover over a row and its place lights up; clicking a marker selects the row, a double-click opens the form window.
5.3 The trip map#
On the trip's map – in the “Map” section and in the overview – ⌥-click or right-click creates a new entry at that spot – accommodation, activity, outdoor activity or journal. For a journey, Etappe asks whether the point is the start or the destination and takes the other end with your next click.
5.4 The compact layout#
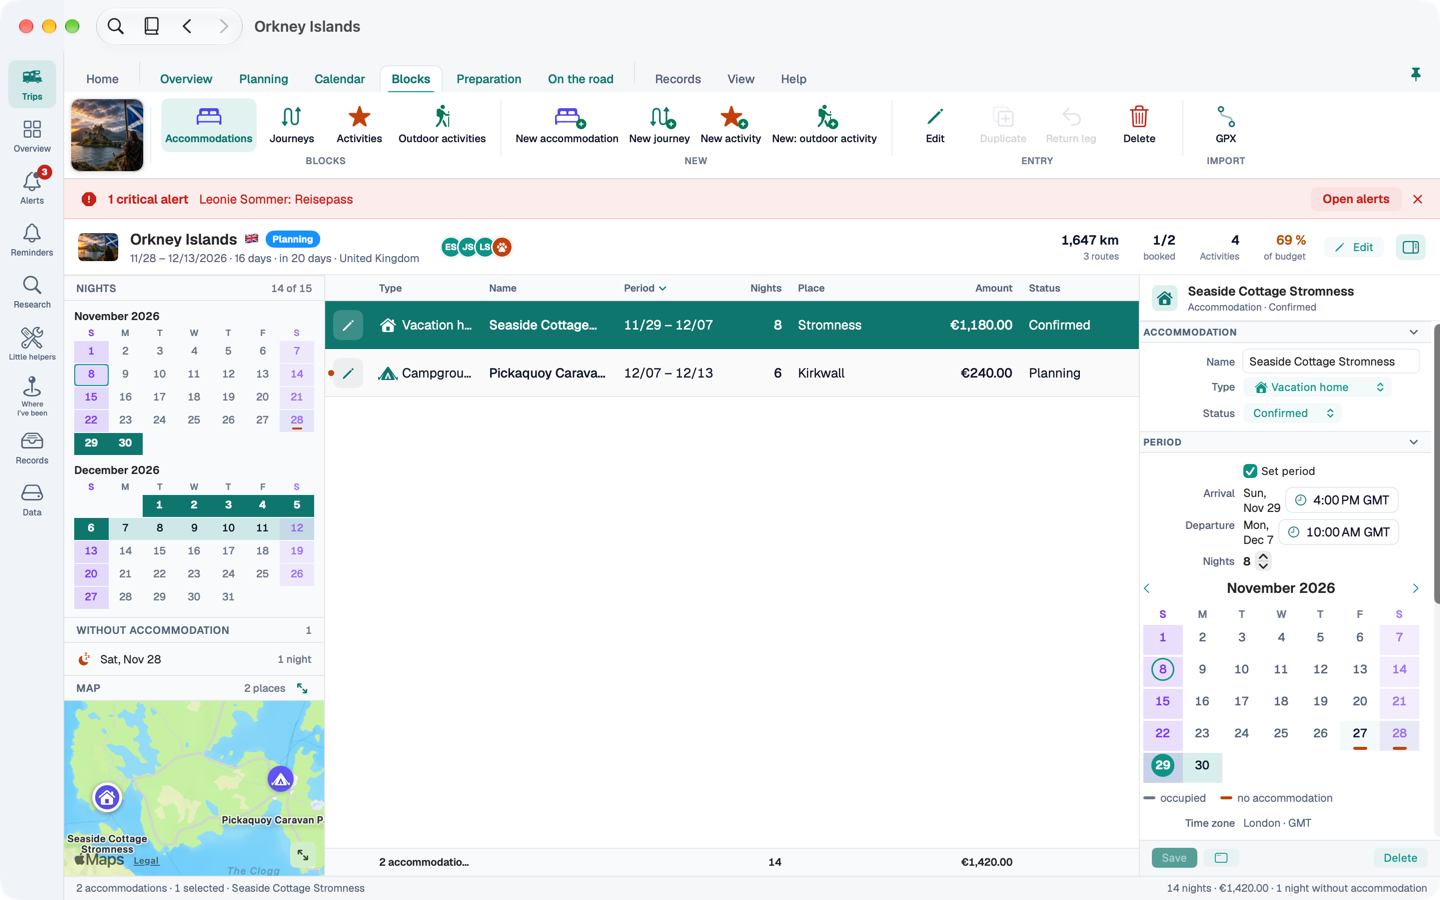
If you have many entries, switch to the compact layout in the “View” band (or in the View menu). It applies to accommodations, journeys, activities, outdoor activities, journal, budget, to-dos, packing list and reminders, and also to the overview and the calendar:
- On the left, filter aids – depending on the section a month grid with the nights, groups or the map.
- In the middle, a table. Click a column header to sort. To-dos, packing list and reminders are ticked off right in the row.
- On the right, the inspector (⌥⌘I): it edits the selected entry without opening a window. If you change rows with unsaved changes, Etappe asks: Save, Discard or Cancel.
What the inspector doesn't show – photos, receipts, GPX, participants, documents – you edit in the form window. A double-click or the pencil at the start of the row opens it. The budget lists every booking of the trip: accommodation, journeys with tolls, activities with costs, and budget items.
You can drag photos into the journal in the compact layout: each photo opens a new entry with the time it was taken, time zone and place. From Photo in the “On the road” band does the same.
6. Form windows#
On iPhone, an entry opens a sheet that fills the screen. On the Mac, it opens its own window. You can have several windows open at once and move them next to the calendar or the map.
6.1 Layout#
At the top is the header with name, type and status. Below, tabs organise the content – for a journey, for example, Route · Times · Details · Costs · Notes. You choose the type – accommodation type, means of transport, activity type – with symbol tiles; hover over one to see its name.
A few things specific to the Mac:
- Place search at the top of the “Place” tab. From three characters on, Etappe suggests places, preferably near the trip. A suggestion fills in place, country, address and coordinates.
- Dates in a calendar. For accommodation, click the arrival first, then the departure. Nights of other accommodation are grey, gaps and overlaps orange.
- Clocks and time zones. You set times on a clock; below it, a map shows the place's time zone. For journeys, departure and arrival each sit in their own zone.
- Route map. For a journey, a click in the map sets the start, a waypoint or the destination.
- Documents and photos can be attached once the entry has been saved.
6.2 Saving and cancelling#
⌘S saves, ⎋ cancels. Deleting always asks first. New entries take along where you created them – for example the day, if you clicked a day in the calendar.
6.3 When the same entry was changed elsewhere#
Windows often stay open for a long time on the Mac. If the same entry changes in the meantime – in another window, in the inspector, or via iCloud on the iPhone – this happens:
- If you haven't changed anything in the window yet, it quietly loads the new version.
- If you have already changed something, the window shows “Changed elsewhere in the meantime”. When you save, Etappe asks: Cancel, Reload (discard your input) or Save Anyway (write your version over the other one).
- If the entry was deleted, the window says it no longer exists.
Form windows don't reopen after the app restarts; main and trip windows do.
7. Calendar and sketch#
7.1 The calendar#
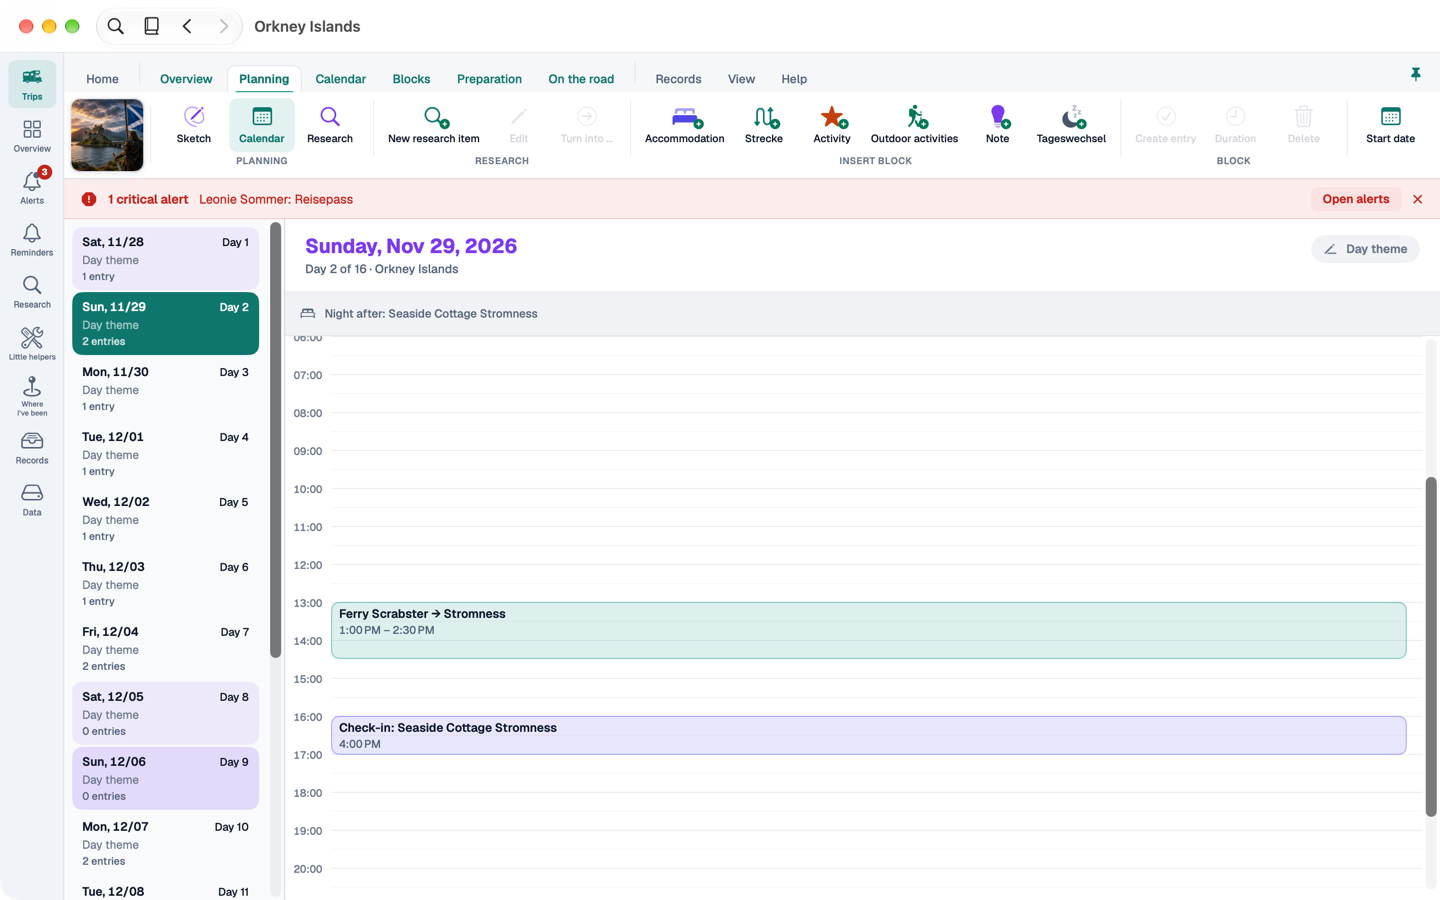
The calendar shows the days of the trip as a bar and the selected day as a timeline, in the time zone that applies that day. A click selects an entry, a double-click opens its window. The context menu (right-click) has the same commands as on iPhone: Edit, Move to …, half an hour earlier or later, copy and return trip for journeys, Delete.
The Calendar tab in the ribbon carries the matching commands: Add (with the selected day), Move, Duplicate, Delete, Agenda or Day, Day theme and Jump. You can also set the day theme by clicking the day's header. Saturdays are tinted lightly, Sundays more strongly in violet.
In the compact layout, the calendar shows a month grid on the left, the agenda of all days next to the timeline in the middle, and the inspector of the selected appointment on the right.
7.2 The sketch#
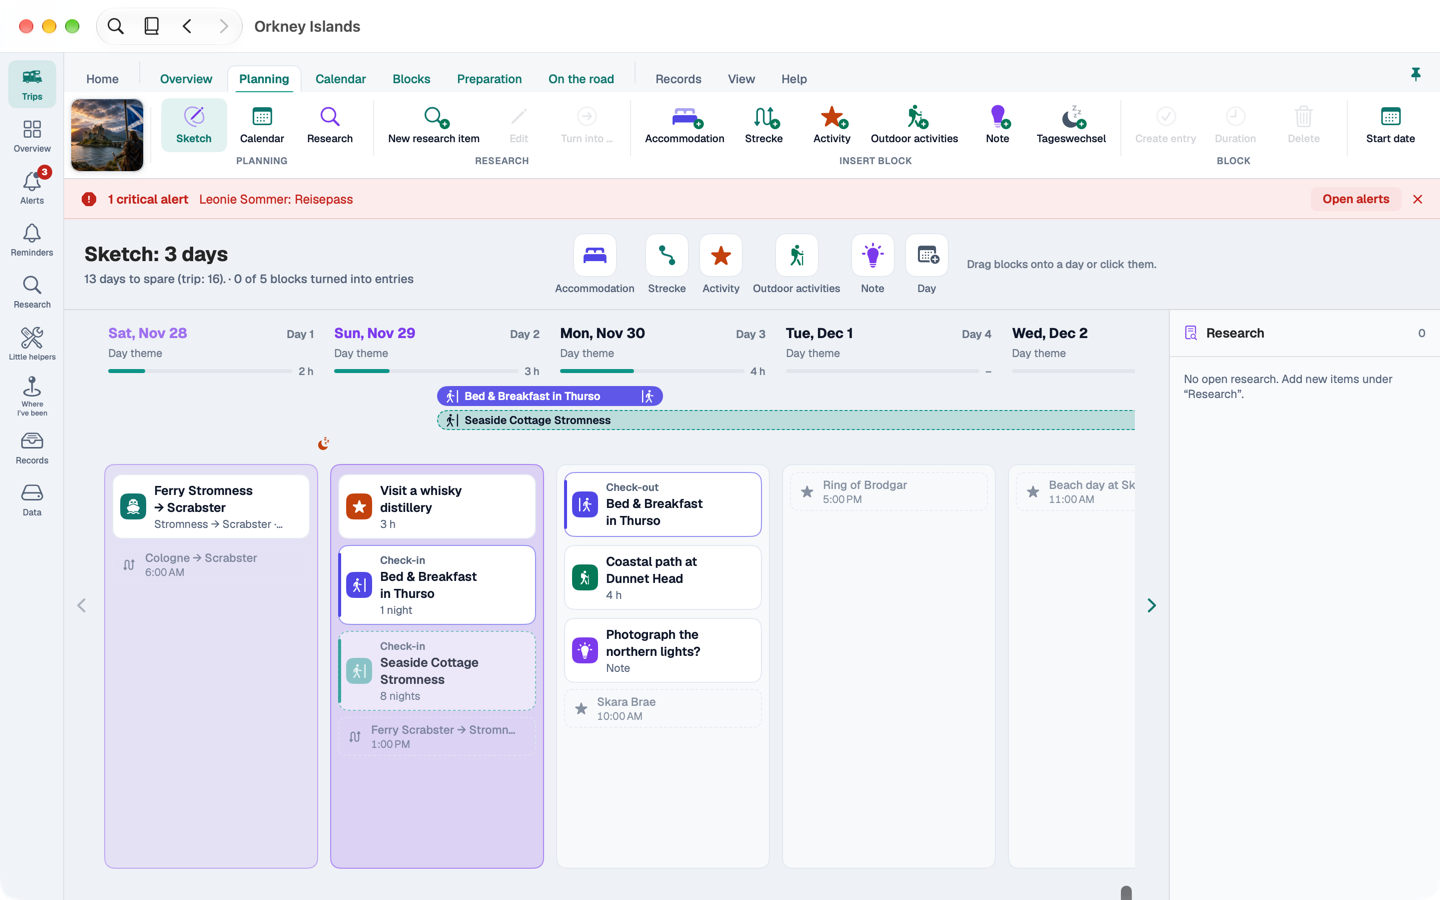
In the sketch you plan a trip roughly, before dates are fixed – as on iPhone, but with drag and drop:
- The palette at the top. From there you drag a block – an accommodation, a journey or an activity, for example – onto a day. The “Insert block” band also works as a source to drag from.
- Days as columns. Without trip dates, at least day 1 is there; with trip dates, all days of the trip. Drop a block on a day that doesn't exist yet and Etappe creates the missing days.
- Duration. When you drop a block, Etappe asks for its duration in hours, or in nights for accommodation. Cancel takes the block out again.
- Accommodation appears as a check-in on the day of arrival and a check-out on the day of departure. Drag the check-in to move the stay; drag the check-out to change the nights. A moon marks nights without accommodation.
- Fill level. Each day shows how full it is – full from ten hours, orange from fourteen.
- Real entries sit faded between the blocks, so you can see what is already fixed.
⌥ and the arrow keys move the selected block. ⌘Z undoes steps in the sketch while its window is in front.
7.3 Research and map panels#
Two panels can be shown on the right:
- Research (⌥⌘R) shows the open research of the trip and research without a trip, folded by category. Drag a research item onto a day to create a linked block; research without a trip then belongs to this trip.
- Map (⌥⌘K) shows the blocks with their day number and a dashed line in day order. Hover over a day column and its markers light up. Drag a block onto the map to give it its place there. With the “Look up route places” switch, Etappe looks up the places of journeys by their names; the place names go to Apple.
7.4 Turning blocks into entries#
Once a block is decided, Create entry turns it into a real entry with dates and times. Create entries (⌘R) does this for all blocks at once. Both ask first.
8. Overview#
The overview (⌘2) looks across all trips. On the Mac it has two views, which you switch in the “View” band or in the View menu: Focus and Timeline.
8.1 Focus#
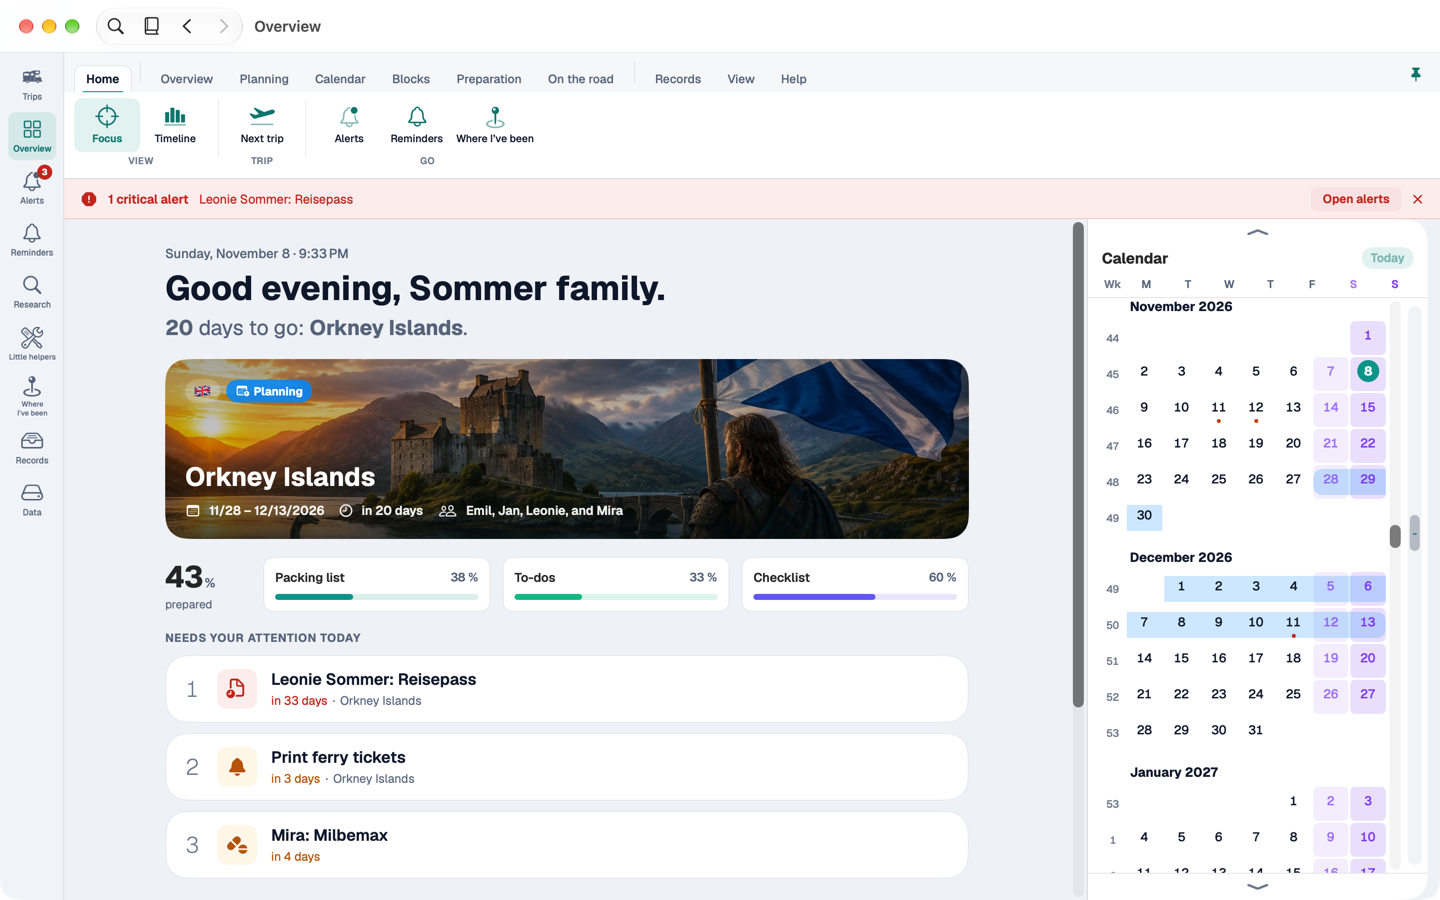
Focus starts with a greeting for the time of day and a sentence about where you stand: how long until the next trip, or which day of the current one it is. Before the trip, a bar shows the preparation; on the road, a day plan with a line for “now”.
Under Needs your attention today are the three most urgent alerts – critical first, then overdue, then due soon. Hover over one to see actions: “Done” and “Later” for reminders, otherwise “Create reminder”. Use ↑ and ↓ to move, ⏎ to jump there, the space bar for a preview.
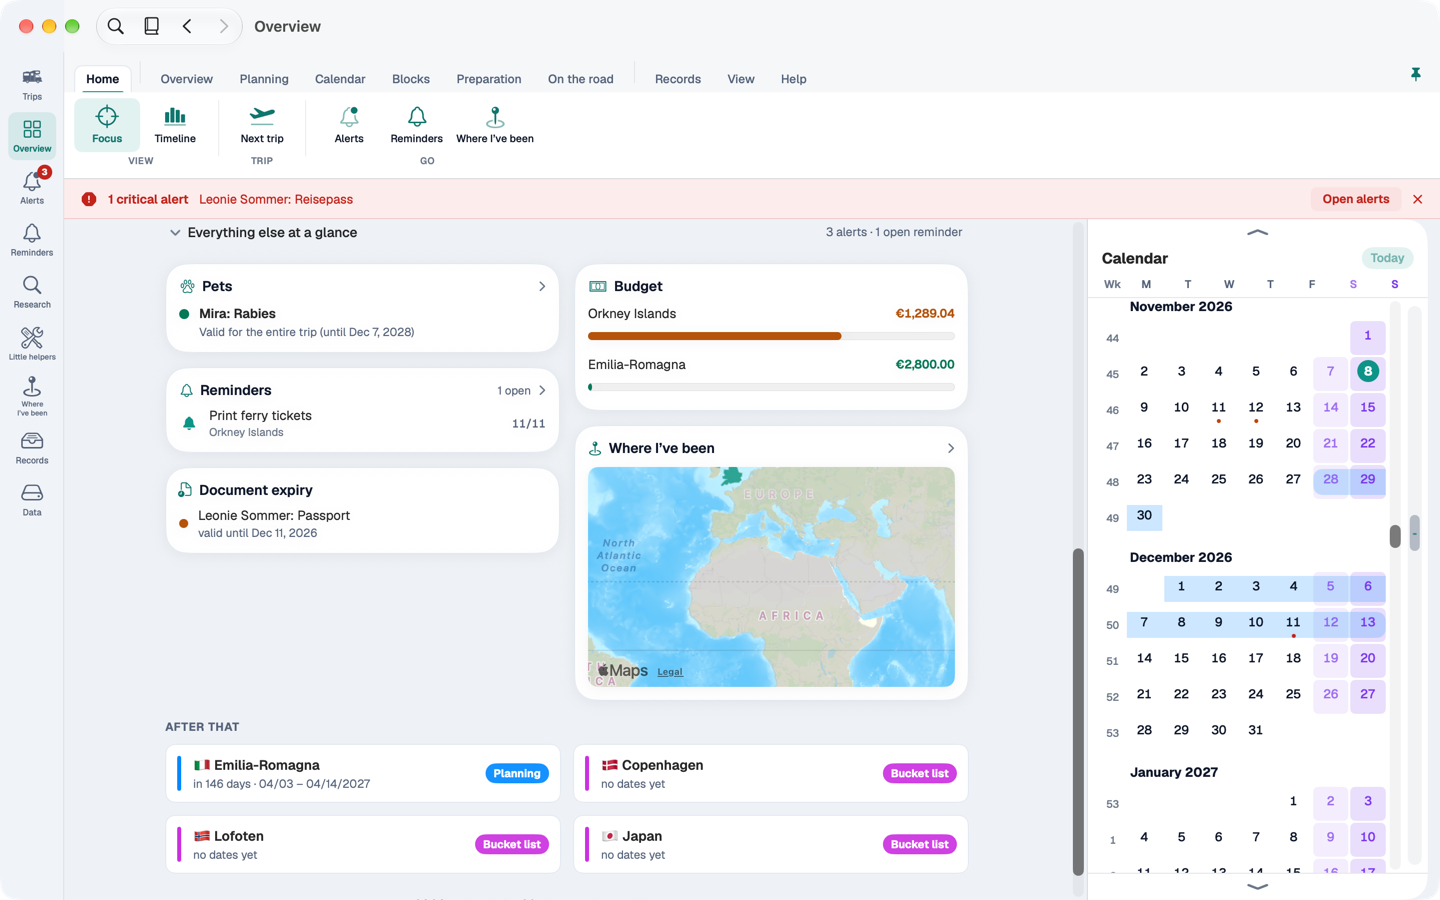
Below, you can expand Everything else at a glance: the cards you know from the overview on iPhone and iPad. Then follow After that and the year in review.
8.2 Endless calendar#
If the window is wide enough, the endless calendar sits on the right: months one below the other, with week numbers, trips as bands in their status colour, deadlines as dots. Click a day to see which trips and deadlines fall on it.
8.3 Timeline#
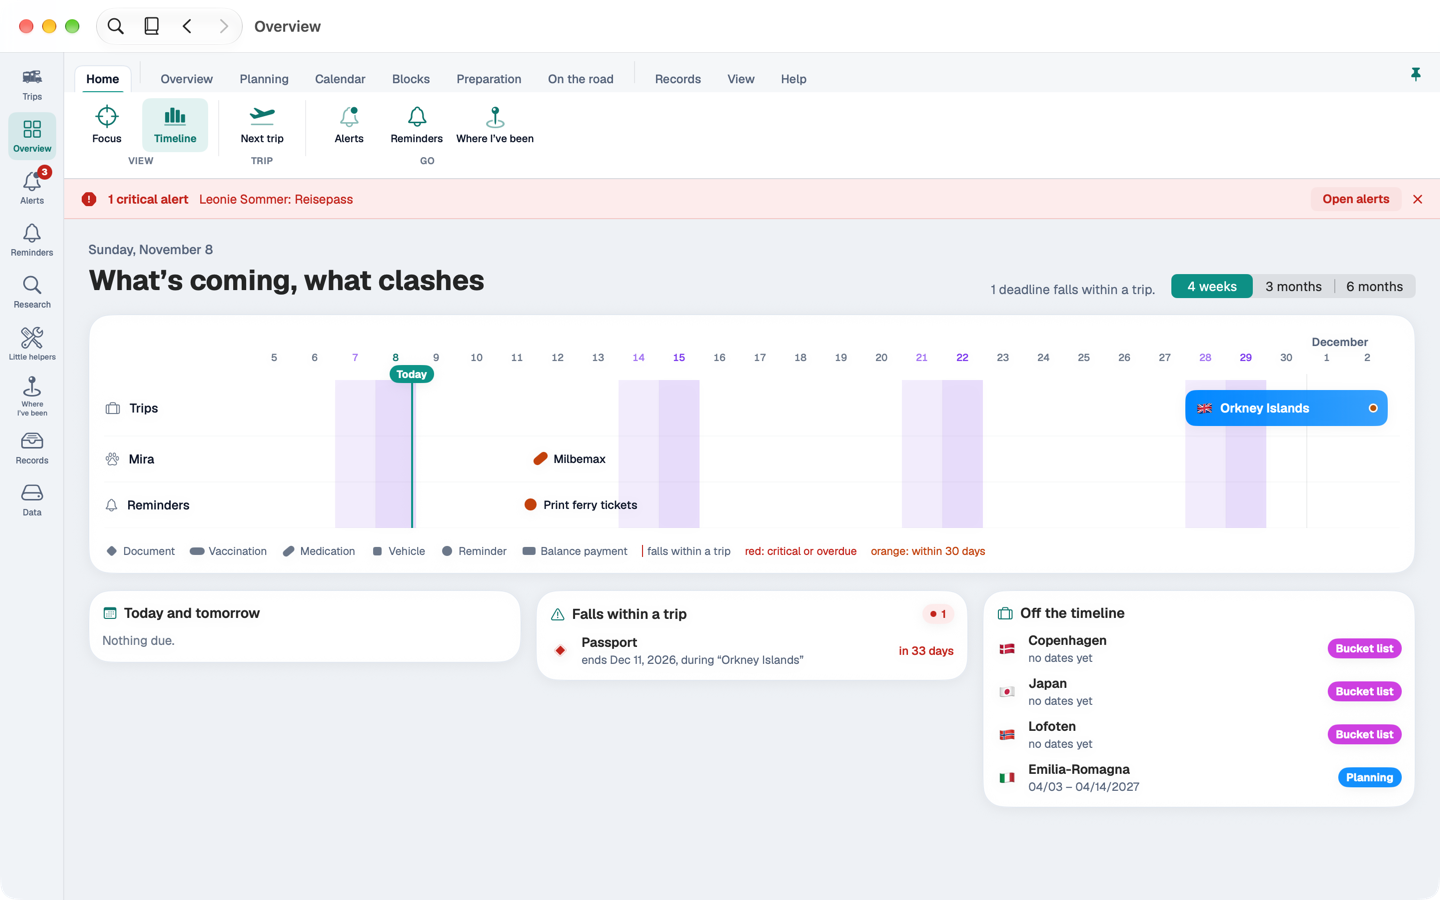
The timeline answers the question: What’s coming, what clashes? At the top are the trips as bars, below them one lane per person, pet and vehicle with their deadlines – expiring ID documents, vaccinations, pets' medication, vehicle papers – and a lane for reminders. If a deadline falls within a trip of its owner, a dashed line connects it to the trip.
Choose the range between 4 weeks, 3 months and 6 months.
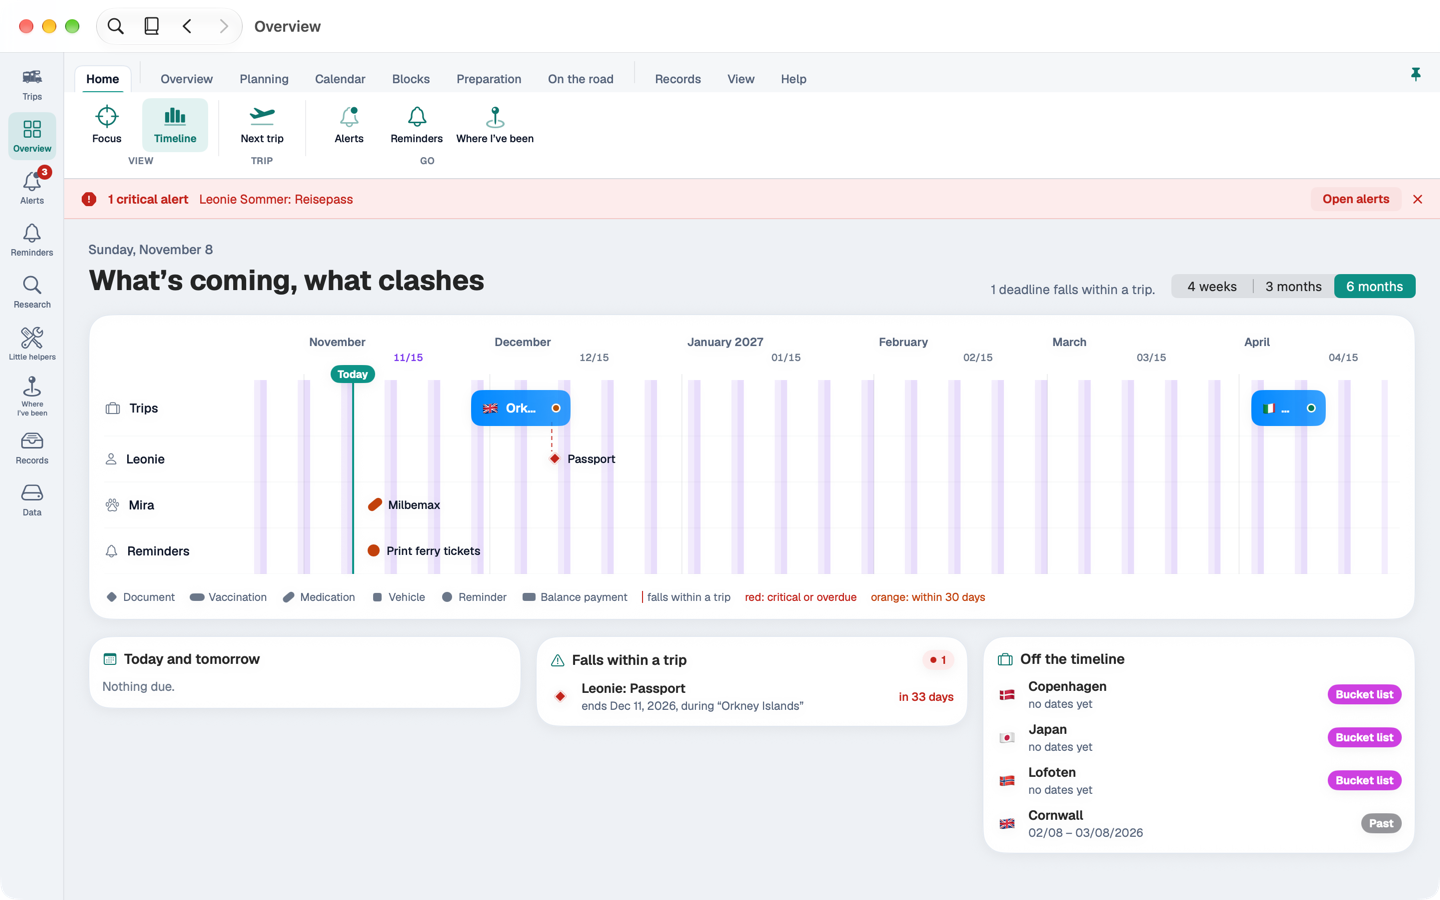
Below the timeline, cards sum up: Today and tomorrow, Falls within a trip, and Off the timeline for deadlines outside the selected range. A click jumps to the owner and selects them.
9. Records, data and settings#
9.1 Records#
Under Records (⌘8), people, pets and vehicles stand in three columns. Clicking an entry slides its column to the left; on the right its details appear – documents, vaccinations, medication, vet appointments, papers, service log – each with a large button for adding. ⎋ or another click on “Records” takes you back.
You edit people, pets, vehicles and countries in their own windows; smaller details such as an ID document or a vaccination open as small windows. People, pets and vehicles can be archived. Countries and packing list templates are found via the “Records” tab in the ribbon; that's also where you load the country data from etappe.app and update the exchange rates.
9.2 Data#
Under Data (⌘9) you find:
- Backup: save all data as a file and restore it. Restoring replaces your data and asks first.
- Trip as file: save or pass on a single trip and take over such a file. You can also open an
.etappe-reisefile by double-clicking it in the Finder or by dragging it onto the window. - Storage: how much space each trip takes, with clean-up.
Load checked trips via Load from Etappe in the “Start” band under “Trips”; send your own trips via Send to Etappe – nothing is sent until you send it in the mail window.
9.3 Settings#
Open Settings with ⌘, or from the Etappe menu. They have the same categories as on iPhone: Full version (with Pro mode and offline mode), Security, External apps, Display, Home, Time zones, Military mode, Currency and Data. On the Mac, routes always open in Apple Maps.
At the bottom of “Data” is Delete all data. After you confirm, Etappe closes all other windows and empties your data. With iCloud, the data is then also gone on all other devices with the same Apple Account. Only a backup made beforehand brings it back. The app lock PIN stays.
9.4 App lock#
Under Security, a PIN protects the app, with Touch ID if you like. The app locks when you switch to another app or the screen sleeps – depending on the setting. The lock covers every window; the menu bar rests until you unlock.
If you came from the “Designed for iPad” version with a PIN set, the Mac app took it over when you switched (Installing and switching over).
10. Keyboard shortcuts#
10.1 Destinations and windows#
| Shortcut | Action |
|---|---|
| ⌘1 … ⌘9 | Trips, Overview, Alerts, Reminders, Research, Little helpers, Where I’ve been, Records, Data |
| ⇧⌘R | All trips |
| ⇧⌘0 | Overview of the open trip |
| ⌘[ / ⌘] | Back / Forward |
| ⌥⌘← / ⌥⌘→ | Previous / next tab |
| ⌘F | Search |
| ⌥⌘N | New main window |
| ⌃⌘O | Trip in new window |
| ⌘, | Settings |
| ⌃⌘S | Show or hide the sidebar |
| ⌃⌘R | Collapse or expand the ribbon |
| ⌃⌘B | Ribbon labels off and on |
| ⌘+ / ⌘− / ⌘0 | Text larger / smaller / normal |
10.2 Views#
| Shortcut | Action |
|---|---|
| ⌃⌘1 … ⌃⌘5 | Trips as gallery, list, globe, map, table |
| ⌥⌘I | Show or hide the inspector |
| ⌥⌘R | Research panel of the sketch |
| ⌥⌘K | Map panel of the sketch |
10.3 Commands#
| Shortcut | Action |
|---|---|
| ⌘N | New trip |
| ⇧⌘N | Trip assistant |
| ⌘E | Edit (selected entry, otherwise the trip) |
| ⌘D | Duplicate the selected journey |
| ⌘R | Create entries from the sketch |
| ⌘P | Itinerary as PDF |
10.4 In lists, tables and windows#
| Shortcut | Action |
|---|---|
| ↑ / ↓ | Select a row |
| ⏎ | Open; in the compact layout, into the inspector |
| Space bar | Preview |
| ⌫ | Delete the selected entry (asks first) |
| ⌘S | Save in a form window |
| ⎋ | Cancel, close, go back |
| ⌘Z | Undo in the sketch, the status columns and the archive drop |
| ⌥ + arrow key | Move a block in the sketch |
| ⌥-click | Create an entry at that spot on the trip map |
11. Only on iPhone and iPad#
The Mac app is built for planning and organising. What you need in your hand on the road stays on iPhone and iPad. Via iCloud, everything you record there also reaches the Mac.
| Feature | On iPhone and iPad | On the Mac |
|---|---|---|
| Recording a journey | Recording a journey | Not available. Driven routes arrive via iCloud or as a GPX file. |
| Camera | Scan an ID document, take a photo | Photos and documents via “Choose from Files”; journal photos can also be dragged into the compact layout |
| Current location | Journal entry and choosing “here” as the place via GPS | Place via search, the map or a photo's GPS |
| Photo library | Choose photos from the library | Choose image files |
| Apple Watch | Today and the calendar of the current trip (Apple Watch) | Not available |
| Quick actions | From the Home Screen (Quick actions) | Not available; the menu bar and keyboard shortcuts instead |