19. Budget#
Etappe doesn’t make you keep the books twice. A trip’s budget builds itself almost on its own: whatever costs you enter for accommodations, journeys and activities count automatically. On top of that come items of your own for everything that has no entry elsewhere — food, fuel receipts, the vet, insurance. Set a budget limit and all of this turns into a status light.
You reach the section via the Budget tile in the trip detail or via the trip’s section picker.
19.1 Setting the trip’s budget#
The limit is a single field on the trip, not on the Budget screen:
- Open the trip and tap Edit.
- Scroll to the Budget section.
- Enter the amount under Available budget. The unit shown beside it is your Base currency — euro, francs, pounds, whichever you chose in the Getting started assistant or under More → Settings (All settings).
If you create a trip with the assistant, it asks for the same field; the subtitle of that page names the currency (“Your total available budget in Swiss Franc …”) (Creating a trip).
The amount is saved together with its currency and the rate to the base, which Etappe freezes when you save. A limit from before the base currency existed — or from a different base — stays as it is: the form then shows its currency as the unit and, underneath, “Amount in EUR (as saved) — the base currency applies to new entries.” If your base has no rate, the field stays in euros and says so.
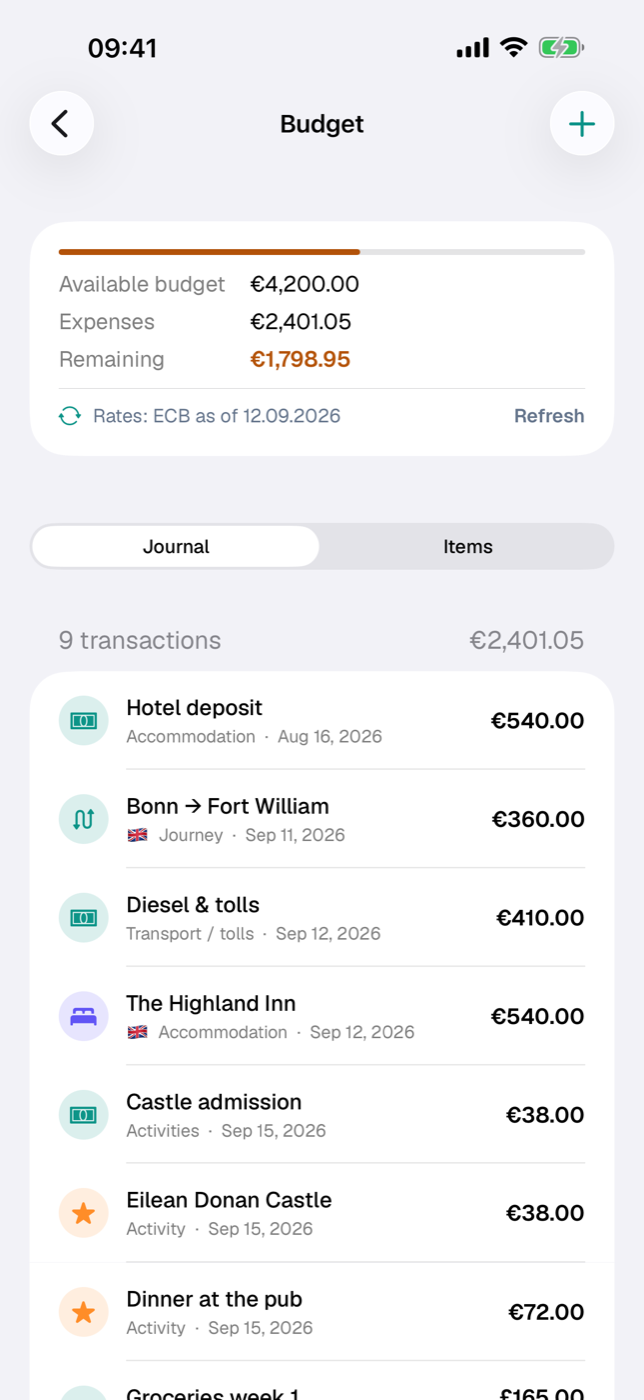
Without a limit, the Budget screen shows only the total of your expenses and a note that there is no status light until a budget is set. With a limit, the top of the screen shows a progress bar in the status-light color and three lines: Available budget, Expenses, Remaining. Below that — with or without a limit — sits the line Rates: ECB as of … with the Refresh button; more on that in 19.4 Foreign currency and exchange rate.
19.2 What counts automatically: accommodations, journeys, activities#
You don’t have to enter planned costs twice. The expense total includes:
| Source | What counts | Transaction date |
|---|---|---|
| Accommodation | “Costs” field | Check-in |
| Journey | “Costs” field | Departure |
| Journey | “Toll costs” field (own transaction) | Departure |
| Activity | “Costs” field | Start |
| Budget item | Amount, converted if needed | Paid on, otherwise Due on |
Two things are deliberately handled differently. A journey’s Fuel costs do not count — they are a planning estimate. What you actually spent on fuel goes in as a budget item; otherwise both would end up in the total. And Outdoor activities have no cost field at all; a lift ticket becomes an activity or an item of your own (Outdoor activities).
You enter the cost fields of accommodation, journey and activity in your base currency; Etappe freezes the rate to the base when you save, and an existing amount in another currency stays as it is (Accommodations, section 15.3). Only the budget item lets you pick the currency freely (see 19.4 Foreign currency and exchange rate).
19.3 Adding your own budget items#
- On the Budget screen, tap the plus at the top right (New item).
- Give it a Name — without one, “Save” stays disabled.
- Choose a Category: Accommodation, Ferry / Flight, Transport / tolls, Activities, Food & drink, Groceries, Vet, Insurance or Other.
- Optionally a Country. The choices are the trip’s countries; if the trip has only one country, it is already set for new items (Countries).
- Enter the Amount and choose the Currency — preselected is your base currency (see the next section).
- If needed, set Paid and a Due date. The calendar highlights the trip period.
- Save.
In the Items view you can later check an item off as paid by tapping the circle on the left — Etappe records today’s date as the payment date when you do. An unpaid item whose due date has passed shows its date in red. To edit, swipe the row from left to right; to delete, from right to left.
Whether an item is paid makes no difference to the total: planned and settled amounts both count as expenses.
19.4 Foreign currency and exchange rate#
The Currency field is a picker: your base currency (preselected), euro, the currencies of the trip’s countries and the currencies of the ECB rate list; Other … unlocks a text field for any other code (three letters, automatically uppercase). If it says anything other than EUR, the EUR factor field appears below. This is the value of one unit of the foreign currency in euros, not the rate in the other direction — the label says so literally: “1 GBP = ? EUR”.
| Input | Meaning | Result |
|---|---|---|
| 120 GBP, factor 1.17 | 1 GBP equals €1.17 | €140.40 |
| 250 NOK, factor 0.086 | 1 NOK equals €0.086 | €21.50 |
Once amount and factor are in place, the form shows the euro amount under Equals, rounded to two decimal places — and, if your base is not the euro, “≈ CHF 150.97” in the base after it (at 1 CHF = 0.93 EUR). The item list shows the original amount in its currency; if the base differs, “≈ …” in the base follows underneath.
You usually don’t need to know the factor yourself: Etappe prefills the empty field — from the ECB rates with six decimal places, otherwise with the inverse of the exchange rate on the selected country or on a country with that currency, rounded to four decimal places (Countries). The prefill only applies while the field is empty or still holds the automatically set value — a factor you entered or adjusted yourself stays, even if the rates change later. Every item keeps its rate as a snapshot.
If the factor is missing — for instance because the currency is in no rate list — Etappe cannot convert: the item remains visible but has no euro amount and counts neither in the total nor in the journal. Both the form and the Budget screen then point this out with a note. If you open the item again later, the factor is prefilled as soon as a rate is known.
The rates themselves come from the European Central Bank — at the press of a button. The line Rates: ECB as of … below the totals in the overview of the Budget screen shows the current state; Refresh fetches the latest reference rates via frankfurter.dev and applies them to the country records. Before anything has ever been loaded, the line reads No rates loaded yet; if a fetch fails, the reason appears as a line below it and the previous state remains. The button requires write access, because it writes to the countries (Trial and full version). What the rates do in detail and where else they appear is explained in Countries, section 6.8.
If your base currency is not the euro and Etappe knows no rate for it — because the currency is outside the ECB list and no country carries a rate — the same overview shows the note No rate for MKD — amounts in EUR: totals and status light then appear in euros until a rate is available.
19.5 Reading the status light: green, yellow, orange, red#
The status light on the Budget screen measures how much of the set limit is still left — as a percentage of the limit:
| Color | Remaining budget | Reading |
|---|---|---|
| green | more than 50 % | plenty of room |
| yellow | more than 20 % | half is gone |
| orange | 0 to 20 % | getting tight |
| red | below 0 % | budget exceeded |
The color tints the progress bar and the Remaining line. Once the budget is exceeded, the bar stays full and the remaining amount goes negative.
Expenses and Remaining are totals in your base currency: Etappe adds up all amounts in euros and converts the result into the base once, at the end — not each transaction individually, so that no rounding remainders pile up; rounding happens only at display time. The status light itself works in euros and therefore doesn’t depend on the day’s rate. Available budget stands as a single amount in its own currency — CHF 5,000 remain CHF 5,000.00 — with “≈ …” if the base differs (How Etappe does the math).
The Budget tile in the trip detail shows the share already spent as a percentage instead of the remaining amount — with the same status light and the same thresholds as here; underneath it says “CHF 1,200 left” or “CHF 350 over budget” in the base, without decimal places. Without a limit, the tile shows the expense total with the symbol of the base. The Overview also shows the remaining amount per trip in this color.
19.6 Journal and Items — the two views#
The switch below the overview offers two perspectives on the same figures.
Journal is the default view: all expenses across every source, in chronological order, each with symbol, country flag, category and date. Every transaction shows its amount in the currency it was saved in; if your base differs, “≈ …” in the base sits underneath. The header names the number of transactions and the total in the base. Entries without a date come last. An item moves to the position of its payment date as soon as you check it off.
Items shows only your own entries, grouped by category, with a subtotal per group in the base. Within a group, the items are ordered by due date. Ticking off, editing and deleting are only possible here; New item, on the other hand, is available at the top right in both views.
19.7 Receipts for expenses#
A budget item can hold files, too — the fuel receipt, the vet’s invoice. To do that, open the item for editing (swipe the row from left to right); at the end of the form sits the Documents card with file and photo import, just as in the detail views (Documents and receipts). When you create a new item, the card is not there yet: save first, then attach.
Receipts for the transactions that count automatically still go where the entry lives: on the trip, the accommodation, the journey or the activity — via the Documents card in the respective detail view.
There, the context menu of an attached document offers Mark as booking receipt. Only marked receipts end up in the appendix of the itinerary PDF when you switch on “Attach booking receipts” during export (Exports and printouts). The budget item has no such mark — its receipts stay in the app.
Linked from
- 4. Core concepts
- 6. Countries
- 9. Vehicles
- 12. Creating a trip
- 14. Research
- 15. Accommodations
- 16. Journeys
- 17. Activities
- 18. Outdoor activities
- 23. Documents and receipts
- 28. Recording a journey
- 31. Overview
- 36. Storage and files
- 40. All settings
- 41. How Etappe does the math
- 42. FAQ and troubleshooting
- 43. Glossary