20. Packing list#
Every trip has its own packing list. You fill it with one tap from a template, add whatever belongs this time, assign individual items to your travel companions and check things off as you pack. At the end, you can export the list as a PDF — complete or for a single person.
You reach the Packing list section in the trip detail via the eye symbol (“View sections”) in the bottom bar. If the overview already shows a Next steps card, the line “Packing list x/y” takes you straight there.
20.1 Filling a trip’s packing list#
If nothing has been entered yet, the notice “Packing list is empty” greets you with the Apply template button. But you don’t have to start with a template — the plus at the top right creates an entry of your own at any time.
- Tap the plus. The New item form opens.
- Under “What needs to come along?”, enter what it is. Without text, Save stays grayed out.
- Set a Category. You can type freely or take over a category already in use via the small picker symbol next to it. The list additionally suggests Documents, Clothing, Toiletries, Electronics, Pet supplies, Car and Beach. If you leave the field empty, the entry ends up under “Other”.
- Set the Quantity if needed (1 to 99).
- Assign the entry in the Person section — or leave it at “General”.
- Save.
To edit an entry, swipe a row from left to right and tap Edit. Swiping in the other direction deletes the entry without asking.
New entries and changes require write access. Once the trial has expired, the purchase notice appears instead — see Trial and full version.
20.2 Applying a template#
Templates span all trips and are maintained under Packing list templates. Etappe comes with three ready-made ones: Basic weekend, Road trip with dog and Beach trip.
In the packing list toolbar menu, choose Apply template. The sheet shows all templates with their name, the number of their items and the stored note. Tapping a template appends its items to the packing list — with category and quantity, but always as “General”, that is, without an assignment to a person.
The rule in the footer matters: existing entries with the same category and the same name are not added twice (upper and lower case make no difference). That lets you combine several templates without the passports showing up three times in the list. If you apply the same template again later, only the entries you have deleted in the meantime or added to the template come in.
If you don’t have a template yet, the sheet reports “No templates” and points you to the Packing list templates section.
20.3 Assigning entries to a person#
Every entry either belongs to a person from your records (People) or counts as general — typical for things that only need to come along once, such as the first-aid kit or a travel adapter.
You set the assignment in the form under Person → Assigned. Archived people no longer appear there; one that is already assigned remains selectable so that old entries can still be edited. If no people have been created at all, the form points out that all entries count as general.
In the list, the name appears in small print below the label. Via Filter in the toolbar, you hide things selectively:
| Selection | Shows |
|---|---|
| All | the complete packing list |
| General (no person) | only entries without an assignment |
| A person’s name | only that person’s entries |
Only people with at least one entry assigned to them are available for selection. Whether the first name or first and last name appears there is set with “Names in checklists” under All settings.
20.4 Checking off, quantities, categories#
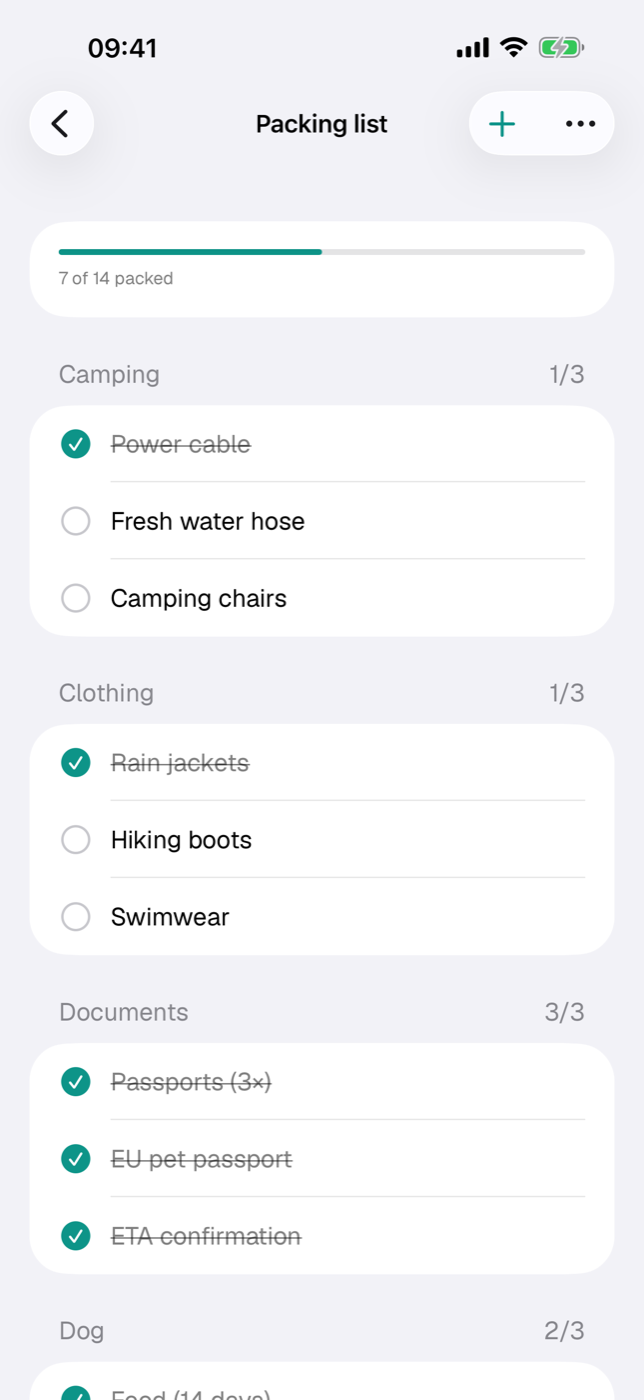
Tapping the row checks the entry off: the empty circle becomes a check mark, the text is struck through and turns gray. Another tap undoes it. There is no separate edit mode for checking off — the whole row is the switch.
The list is grouped by category, sorted alphabetically. On the right of the section header is the status of that category, such as “4/7”. Within a category, the entries appear in the order in which they were created or taken over from the template. Quantities above 1 appear on the right as “× 3”.
At the very top, a bar shows the overall progress with the line “x of y packed”. It follows the filter you have set: if you have filtered by a person, the bar counts only that person’s entries — handy when everyone packs for themselves.
20.5 Packing list as PDF — complete or per person#
In the toolbar menu you find Export as PDF with two kinds of entries:
- The first entry exports the current view: without a filter the complete list, with a person or General filter set exactly what is currently visible — the menu item is then called Current view (…).
- For … with the name — one menu entry per person who has at least something assigned. This PDF contains that person’s items and all general entries.
The PDF is laid out in A4 format: header “Packing list · trip title” (in the per-person version supplemented by the name), below it “x of y packed” with the date of the printout. Then come the categories with checkboxes — items already checked off already carry the check mark, quantities are in parentheses after the name. Names appear in the PDF in the same format as in the list (“Names in checklists” setting).
After generating, the preview opens. From there you can save, print or send the PDF via the Share symbol. The file is only created temporarily; for a permanent copy, save it from the preview. The app’s other output formats are described in Exports and printouts, the complete backup of your data in Backup.