29. Journal#
The journal is the looking-back part of a trip. While accommodations, journeys and activities describe the plan, this is where you record what actually happened: text, a highlight, photos, a spot on the map. At the end, all of it can be exported as a PDF.
You reach the section through the trip’s section picker (the eye in the toolbar); the Journal tile there shows the number of entries. As long as nothing has been recorded, it reads No entries yet with the button Write entry.
29.1 Creating a journal entry#
The plus at the top right opens a menu with three options:
| Menu item | What happens |
|---|---|
| Empty entry | Form with a default date, otherwise blank |
| Here & now | Form with the current time and GPS location; meanwhile “Preparing entry …” appears briefly |
| From photo … | Photo picker; date and location come from the image (see 29.2 Attaching photos — date and location come from the photo) |
The form is called New entry and has four sections:
- Day — Date (the calendar highlights the trip period), Time, Title and Mood.
- Entry — the large text field What happened? and, below it, Current highlight.
- Location — country, map selection and coordinates (see 29.3 Setting a location or choosing it on the map).
- Weather — the Weather picker with categories from sunny to thunderstorm and the field Temperature (°C). You enter both yourself; they then appear in the list, in the entry and in the PDF.
Save creates the entry, Cancel discards it.
The defaults are sensible, but nothing is set in stone: the date is today if it falls within the trip period, otherwise the trip’s start date. The time is the current time for today and 12:00 PM (noon) on other days. If the trip has exactly one country, it is already selected (Countries).
Several entries on the same day are expressly allowed — morning and evening can stand separately. New entries go to the end of their day.
Two more routes lead to the same form: a long press on the trip map, where you choose the type Journal in the New entry dialog (Map), and the quick action Journal entry, which opens the camera first (Quick actions from the Home Screen).
29.2 Attaching photos — date and location come from the photo#
Photos are attached to an opened entry. In the Photos card, tap Add photos and choose up to 20 images. They appear as a grid of tiles; a long press on a tile offers Delete photo.
When adding, Etappe reads the capture data stored in the image:
| Value in the photo | Used as | If missing |
|---|---|---|
| Capture date with time | Date and time of the entry (only with From photo …) | today’s date |
| GPS coordinates | Location of the entry | no location |
With From photo …, this happens when the entry is created, before the form even opens. If you attach photos to an existing entry, Etappe asks: Use location from photo? with Apply and No. The question only appears when the entry has no location yet — a location that has been set is never silently overwritten. The first photo with coordinates is used.
When saving, Etappe scales each image down to at most 2,000 pixels on its longer edge and stores it as a JPEG. The capture data is dropped in the process — it has already been read by then, but the copy in the journal no longer carries it. How much space the photos take up is shown in Storage and files.
29.3 Setting a location or choosing it on the map#
The Location section has three things side by side:
- Country — the choice is the trip’s countries, plus Not specified. The country’s flag later appears in the list and in the entry.
- Choose on map — opens the Choose location map. A tap sets the marker, Current location jumps to your position, Apply writes the coordinates into the form. If a location is already set, the coordinate pair replaces the label.
- Latitude and Longitude — for entering values directly.
In the opened entry, the Location map shows the point with a marker; you can pan and zoom in it. Without a location, there is no map at all.
29.4 Mood, highlights and notes#
Mood is a single value with five levels, plus Not specified:
| Mood | Shown as |
|---|---|
| great | yellow star |
| good | green thumbs up |
| okay | gray equals sign |
| so-so | orange thumbs down |
| bad | red cross |
Current highlight is a single line for the moment that made the day. In the entry it stands out with a sparkle symbol; in the PDF it gets its own colored box.
The actual text goes in What happened?. The field grows as you type and shows up to 15 lines. Blank lines between paragraphs pay off: the PDF breaks long entries exactly at these points. The Title is optional; without one, the entry carries only its date.
29.5 Browsing and editing entries#
The list is chronological, oldest first. The arrow button at the top right reverses the order — Newest first or Oldest first.
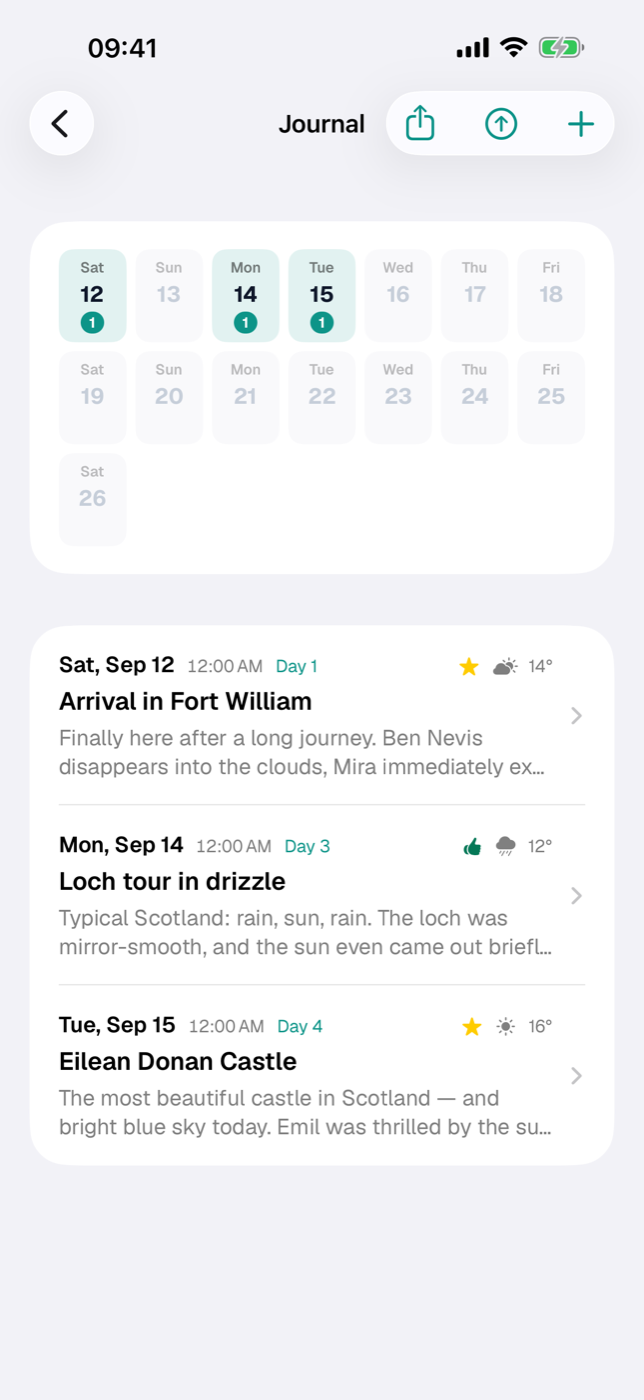
On multi-day trips, a day grid sits above the list: each travel day as a tile with weekday and date, days with entries with a count pill. A tap jumps to the first entry of that day; days without an entry can’t be tapped. Entries outside the trip period still get a tile.
Each row shows weekday and date, the time, the number of the travel day (Day 3), the country flag and mood symbol, the weather you entered with temperature, plus the title and the first two lines of text. Counting starts at the trip’s start date; entries before it get no number.
- Open: tap the row. Edit at the top right opens the same form as when creating, now titled Edit entry.
- Delete: swipe the row to the left.
If you move the date to a different day while editing, the entry goes to the end of that day.
29.6 The journal as a PDF#
In the journal list, the share symbol at the top right (Share as PDF) generates the document; without entries, the button is disabled. The same command is in the trip’s share menu as Journal as PDF. The structure:
- Cover page with the trip’s cover image, the heading “Travel journal”, trip title, period, country flags and the counts of entries and photos.
- One page per entry with date and time in the header, title, the pill Day 3, the mood as a capsule, the highlight box, the text paragraph by paragraph, the photos two side by side and the coordinates at the foot.
- If an entry doesn’t fit on one sheet, it continues on further pages, marked Continued.
Photos are scaled down to 1,200 pixels on the longer edge for the PDF so the file stays manageable. Then the iOS share sheet opens: save, print, send. The other output formats are listed in Exports and printouts.