18. Outdoor activities#
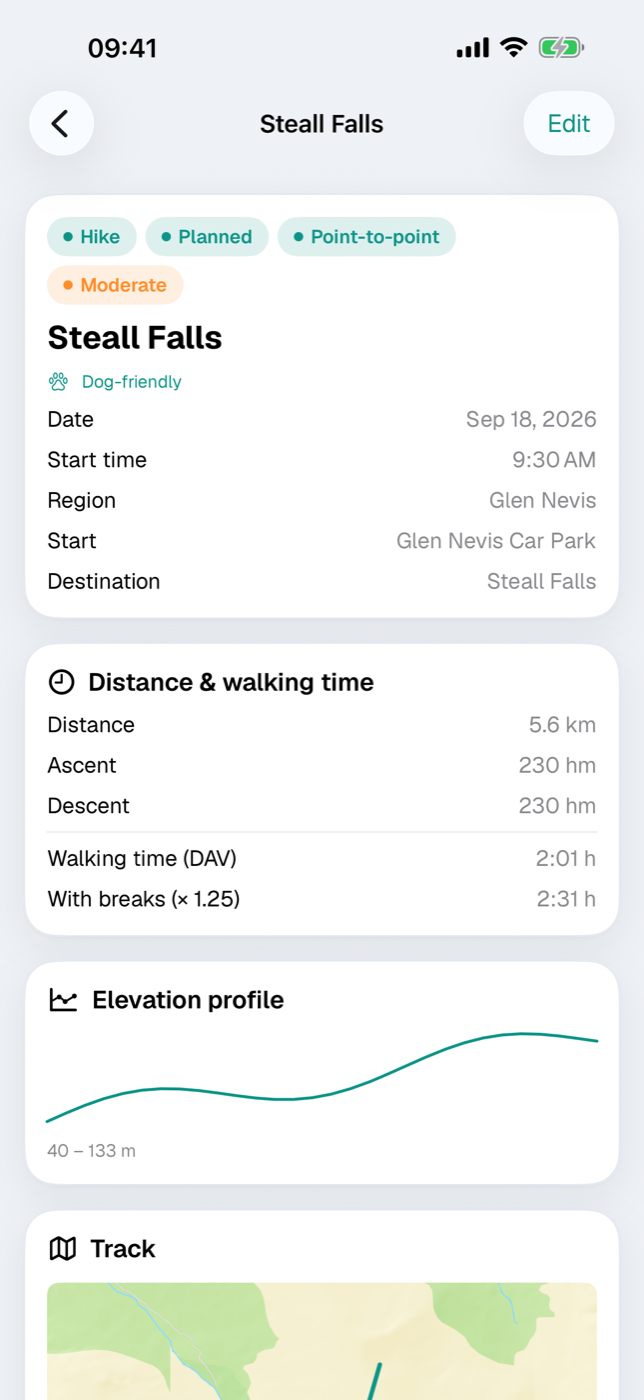
A hike is not an activity like a museum visit: it has a distance, elevation gain, a difficulty level and a duration you can calculate. That is what the Outdoor activities section is for — everything you cover under your own power, on foot or by bike. You reach it in the trip through the Outdoor activities tile or the floating actions. Above the list is a summary with Distance, Elevation gain and Walking time.
18.1 The eight types: Hike, Long-distance hike, Mountain hike, Via ferrata, Bike tour, Mountain bike tour, Long-distance cycle route, City walk#
The Type sits at the very top of the form. It determines the symbol in the list and the detail view — and whether the walking time is calculated. On the map, all outdoor activities share the same pin.
| Type | Walking time (DAV) |
|---|---|
| Hike | yes |
| Long-distance hike | yes |
| Mountain hike | yes |
| Via ferrata | yes |
| City walk | yes |
| Bike tour | no |
| Mountain bike tour | no |
| Long-distance cycle route | no |
The DAV formula applies only on foot. For the three bike types, the detail therefore shows only Journey instead of “Distance & walking time”, and the trip’s total walking time leaves them out; enter the expected time there under Planned duration.
18.2 Key data: distance, elevation gain, route type, difficulty#
The descriptive fields are in the Entry section:
- Region and Country place the tour; the trip’s countries are available for selection (Countries).
- Route type has three values: Loop, Point-to-point, Semi-loop.
- Difficulty is Easy, Moderate or Hard and appears as a colored pill: green, orange, red. Without an entry there is no pill.
- Status is Planned, In progress or Done.
Start point and End point are text fields. The numbers are in the Distance section: Distance in km, Ascent in hm, Planned duration in hours. The descent comes exclusively from a GPX file (see 18.4 Understanding the walking time by the DAV formula).
A Date is optional; otherwise the entry lands under No date yet. With Set start time, the tour becomes a calendar event with a time — the end follows from the walking time including breaks; without a start time it counts as all-day (Calendar and day view).
18.3 Importing a GPX file — track, elevation profile and key figures#
If the tour exists as a GPX file, importing it is the fastest way to reliable figures.
- In the GPX section, tap Import GPX file.
- Choose the file (25 MB at most).
- Etappe reads the track and shows a From GPX line with distance, ascent and descent.
Track points are evaluated first; if there are none, Etappe falls back to route points and then to waypoints. From these it derives:
- the Distance as the sum of the gaps between all points,
- Ascent and Descent from the elevation values (all climbs and all drops added up, not the difference between the highest and lowest point),
- the Track for the map, thinned to 200 points at most,
- the Elevation profile, thinned to 48 values at most,
- the Start point for the pin on the trip map (Map).
Empty fields are prefilled: name, distance and ascent. Values you changed by hand stay as they are. If you replace the file later, Etappe also updates the fields that still came unchanged from the old track — not your own figures. It rejects unreadable files with “The file could not be read as GPX.”
The file is only stored when you tap Save. In the detail you then see the Elevation profile card (with lowest and highest elevation) and the Track card, and in the list the profile as a mini curve; the space it takes is shown in Storage and files. The route you actually covered on the way is handled by the recording on a journey (Recording a journey).
18.4 Understanding the walking time by the DAV formula#
Etappe calculates by the formula of the German Alpine Club (DAV, DIN 33466). It separates climb and distance and assumes that you handle both partly at the same time:
- Vertical time = ascent ÷ 300 + descent ÷ 500 (300 meters of elevation per hour up, 500 down)
- Horizontal time = distance ÷ 4 (4 km per hour on level ground)
- Walking time = the larger of the two values plus half the smaller
Example: 12 km with 800 m of ascent and descent give 2.67 + 1.60 = 4.27 h vertical and 3.00 h horizontal — so the walking time is 4.27 + 1.50 = 5:46 h.
Below that is With breaks (× 1.25): a 25 percent surcharge for rests and photos. The calendar also uses this value as the duration.
Two things matter:
- Manual values take precedence. If distance or ascent holds a figure of your own, Etappe calculates with it; the GPX value applies only when the field is empty.
- If the descent is missing, it is estimated. Without a GPX file, Etappe sets it equal to the ascent and says so: “Descent unknown — assumed equal to the ascent.” For a point-to-point route going downhill, the walking time comes out too long.
The walking time appears in the form as soon as distance or ascent is filled in; the derivation is in How Etappe does the math.
18.5 Dog-friendliness, notes and portal links#
The Dog-friendly switch is on by default. If it stays on, the detail shows a green line with a paw symbol; if you switch it off, it disappears. That way you see at once which tours work with a dog — via ferratas and ladder routes rarely do.
Under Hiking portal you store one Komoot link and one Outdooractive link. A missing “https://” is added by Etappe when saving; addresses with other schemes are discarded so that a link cannot launch a third-party app unasked.
Everything else — refreshment stops, parking, the bus stop at the destination — belongs in the Notes. An outdoor activity entry has no costs; a cable car or toll road goes in as a budget item (Budget).
18.6 Photos and rating after the tour#
After the tour, a second pass is worthwhile: via Edit you set the status to Done, correct distance and elevation gain to the actual values and give up to five Stars — tapping the same star again removes them.
You attach photos and files in the detail via the Documents card — File or Photos, up to five pictures at once (Documents and receipts). Experiences, weather and the mood of the day, on the other hand, belong in the Journal; the outdoor activity entry remains the factual description of the tour.