2. Installation and first launch#
Etappe needs no account and no sign-in: download the app, open it, get going. On the very first launch, a short assistant walks you through the basics. This chapter shows what it does, how to skip it, and how to start from an existing backup instead.
2.1 Requirements: iPhone, iPad, iOS version, storage needs#
| Requirement | Value |
|---|---|
| Devices | iPhone and iPad (one app for both) |
| System | iOS 17.0 or iPadOS 17.0, or later |
| Account | none needed — no login, no registration |
| Internet | only for map tiles, the country download, exchange rates on demand, and the purchase |
| iCloud | optional, to sync between your devices |
The app itself is small; what takes up space is mostly what you attach — photos, document scans, GPX files. How much space goes where and how to clean up is covered in Storage and files.
On the iPhone you work with a tab bar, on the iPad with a sidebar and a detail column — the differences are explained in Finding your way around.
2.2 Downloading and opening the app#
Etappe comes from the App Store. After installing, tap the icon and you first see the launch screen with the wordmark “etappe” and the line “Your travel companion” — it fades out by itself after about two seconds.
Then one of two things happens:
- Your data is empty (no trips, no people, no countries): the Getting started assistant opens automatically.
- There is already data — for instance because your second device has synced via iCloud: you land straight in the Trips list.
The first launch also starts the trial. It runs for 14 days and unlocks everything; after that you decide on the full version. All about it in Trial and full version.
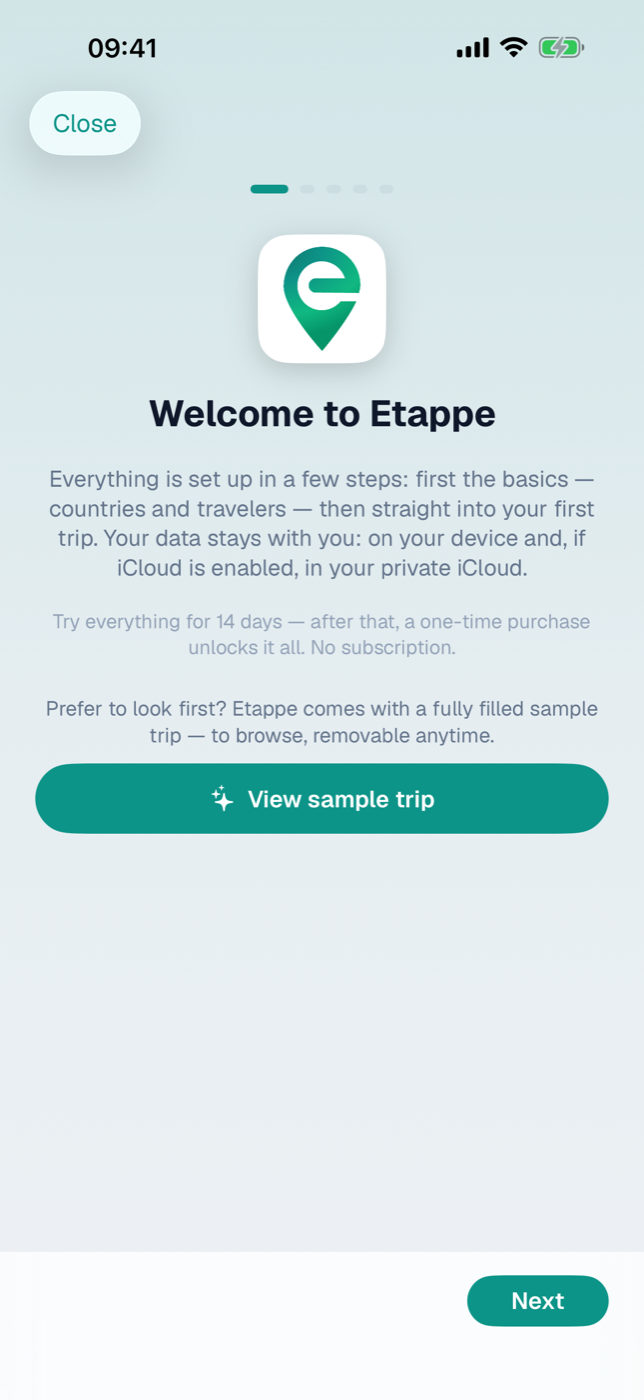
2.3 The Getting started assistant: Welcome → Countries → Travelers → Vehicle → first trip#
The assistant has five pages. Five bars at the top show where you are; at the bottom right, Next takes you forward, and from the second page on, Back at the bottom left takes you back again. On the last page the button is called Done.
- Welcome. A greeting with the note that your data stays with you — on the device and, if iCloud is turned on, in your private iCloud. Below that is the sentence about the trial: you can try everything for 14 days, then a one-time purchase unlocks everything — no subscription. Below that is the button View sample trip — the way to browse before you type anything yourself (section 2.4). Otherwise: Next.
- Load countries. Countries provide entry rules, currencies, and checklists. First, the page asks two things that don’t need any loaded countries: your Home country and your Base currency. Tapping Home country opens a list of every country in the world with flag and search field; the default is the country of your device region. Embassies, emergency numbers, and travel advice in the country data depend on your home country (Home). The Base currency is also prefilled from the region and follows the home country as long as you don’t choose it yourself — pick Switzerland and you get CHF. The choices are the currencies of the ECB rate list (euro, franc, pound, krone, dollar …) plus the currency of your home country if it’s missing there; such entries carry the suffix “no automatic exchange rate”. Both can be changed later under More → Settings (All settings). Then tap Load countries from etappe.app: the app fetches the maintained country file from the web, checks its digital signature, and only then imports it. While loading, the button reads “Loading …”. If countries already exist, a green line with their count appears instead. If the server can’t be reached, the app falls back to the records bundled with the app package — same file, same signature check. Below the green line, a note then shows the date of this data and asks you to check later under More → Records → Countries whether newer data is available on the server. The error message Country import not possible only appears when both routes fail. Right after the import, Etappe fetches the current exchange rates of the European Central Bank once and applies them to the countries; if that fails — say, without a connection — a note appears below the green line, and you fetch the rates later with Refresh Rates (Countries, section 6.8). You can also catch up on the import itself at any time under More → Records → Countries, see Countries.
- Who’s coming along? Here you add yourself and your companions — Add person opens the person form, Add pet the one for dogs, cats, and the like. ID documents, vaccinations, rabies status, and deworming treatment deadlines go in there; later they are the basis for the alerts. The assistant confirms every person and pet you add with a green line. Details in People and Pets.
- Your vehicle. Optional. Add vehicle takes a car, motorhome, or bicycle with dimensions, consumption, and documents — more in Vehicles. If you don’t use a vehicle of your own, just tap Next.
- Your first trip. Start trip assistant opens the guided creation assistant: it asks for destination country, title, companions, pets, dates, vehicle, budget (in your base currency), and cover photo; only country and title are required, everything else can be skipped with Don’t know yet. After saving, you choose Open sketch or Open trip: both assistants close, and the app jumps straight to the Sketch or the trip page (on the iPhone it switches to the Trips tab to do so). The trip assistant is also available later via the plus on the Trips page, see Creating a trip.
Each of these add buttons writes data. If the trial has expired and the full version hasn’t been purchased, the purchase prompt appears instead of the form.
2.4 Skipping the assistant and reopening it later (More → Help)#
Close is always at the top left. It puts you straight into the app. Whether the assistant shows up again on its own afterwards depends on how far you got:
- Closed immediately, still on the Welcome page: on the next launch with empty data, the assistant appears one single more time — in case the first dismissal was an accident. Close it again on the first page, and it stays away from then on.
- Moved on by at least one page: the assistant counts as shown and no longer starts on its own — not even if your data is still empty.
Both apply per device. You can bring the assistant back at any time:
- On the iPhone: More tab → Help. On the iPad: sidebar → Help.
- Tap Getting started there.
As long as no trip has been created, the empty Trips list also offers the row Open getting started beneath Create trip and Add manually — the same assistant, just without the detour through Help.
The assistant remembers nothing from the last round: what has already been created it shows as a green line, the rest you can catch up on. In the same Help area you’ll also find the links Guide on etappe.app and Website.
Viewing the sample trip#
On the Welcome page is the button View sample trip. It creates the sample trip “Tuscany with dog” and opens it right away — a fully filled trip with travelers, dog, vehicle, accommodations, journeys, activities, journal, and budget. That way you see what a set-up trip looks like before you type anything yourself. The Alerts tab fills up with it too, because the sample data deliberately includes a few deadlines that are getting tight.
It’s always recognizable: inside the trip, a permanent bar reads “Sample trip — to try things out”, and in the Trips list its card carries the Sample pill. Made-up data can never be confused with yours.
Remove in that bar clears it out completely — including travelers, dog, and vehicle. Your own data stays untouched: if you’ve since attached one of the sample records to a trip of your own (the country Italy, say), that particular entry stays. Afterwards the Getting started assistant comes back, because now you’re starting for real.
You can load the sample trip again at any time — via More → Help → Getting started and there View sample trip again. If it’s already loaded, you won’t get a second copy.
2.5 Starting from an existing backup instead of from scratch#
If you’ve already used Etappe on another device, you don’t have to type anything again. Two routes get you there:
- Via iCloud, if both devices are on the same Apple ID: syncing happens by itself, see iCloud sync.
- Via a backup file, if you specifically want to transfer or restore your data.
Here’s how to import a backup file:
- On the old device, create an export under More → Backup and share the JSON file to the new device (AirDrop, Files, Mail).
- On the new device, open More → Backup.
- Tap Import backup … and select the file.
- Confirm the prompt Replace all data? with Import.
Important: the import deletes all existing data and replaces it with the contents of the file. That’s why it’s easiest on a fresh device — close the Getting started assistant and import before you create anything. If there’s already something in there that you want to keep, create an export of your own first.
After the import, Etappe lists what arrived: one line per area with a count, and the total below. Everything else about formats, file sizes, and exporting with or without attachments is in Backup.